

I wrote several articles about using Bootstrap CSS UI Framework along with ASP.NET Web Forms and MVC. Still, I’m getting queries on how to add bootstrap in ASP.NET MVC and Web Forms. So, I thought of consolidating the important steps of adding bootstrap to a MVC or Web Forms project. Below are the topics I will be covering in this article. You can jump to the topic of your interest. (UPDATE 2018-03-18: This article has been updated for Bootstrap 4 and .Net Framework 4.7.1)
-
- Adding Bootstrap In ASP.NET Web Forms Using NuGet Package. Jump To Topic ↓
- Steps For Adding Bootstrap In ASP.NET Web Forms Manually (Without NuGet). Jump To Topic ↓
- Adding Bootstrap In ASP.NET MVC Using NuGet Package. Jump To Topic ↓
- Steps For Adding Bootstrap In ASP.NET MVC Manually (Without NuGet). Jump To Topic ↓
- Adding Bootstrap In ASP.NET from CDN. Jump To Topic ↓
- Using Bootstrap Classes With ASP.NET Controls like Server-Side HTML Controls, Web Forms Controls and HTML Helper Classes. Jump To Topic ↓
- Using Bootstrap in Core MVC. Go To Article →
Tools & Framework Used
- Visual Studio 2017 (Version 15.6.2).
- .Net Framework 4.7.1.
- Bootstrap 4.
A. Steps To Add Bootstrap In ASP.NET Web Forms (Using NuGet)
Starting from Visual Studio 2015, Microsoft has added Bootstrap as the default user interface framework through a NuGet package. So, bootstrap will be automatically added to your project, if you choose the ASP.NET Web Forms (.NET Framework) template. But the default bootstrap which comes with it will be of older version, say 3.0.0. You have to upgrade the Bootstrap NuGet package to add the latest version of bootstrap to your Web Forms project.
Here are the steps to upgrade bootstrap through NuGet
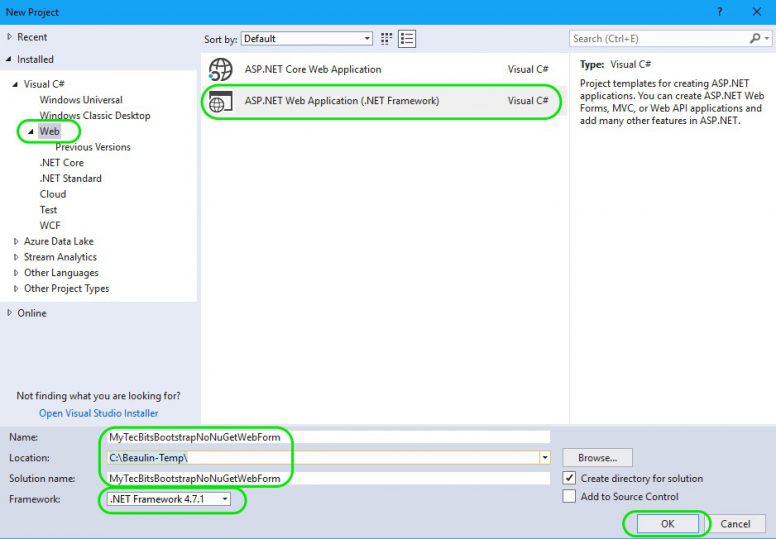
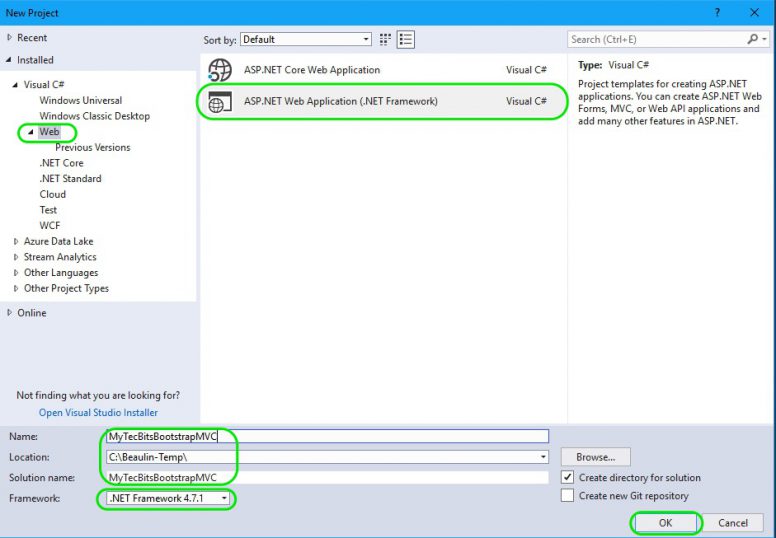
- Start Visual Studio. Go to File menu >> New >> Project.
- In the New Project window, go to Installed >> Visual C# >> Web.
- Select ASP.NET Web Application (.NET Framework), Enter the name of the project and press OK button. (I’ve also selected .NET Framework 4.7.1. But, It is optional.)
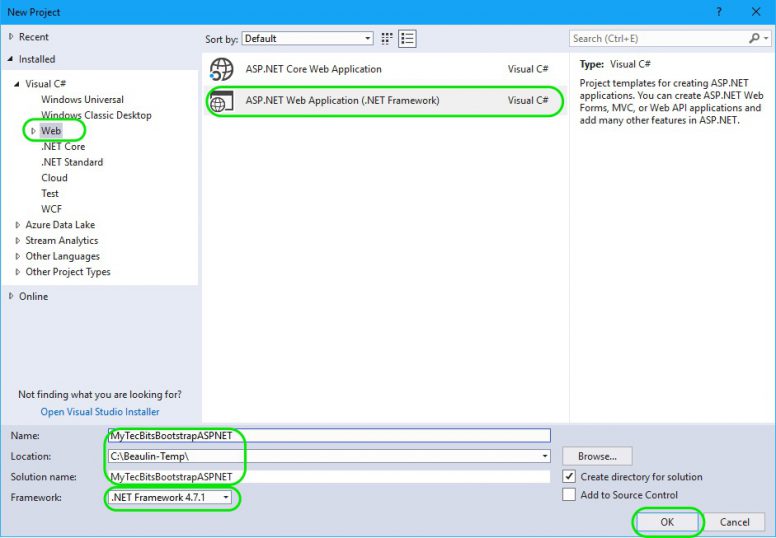
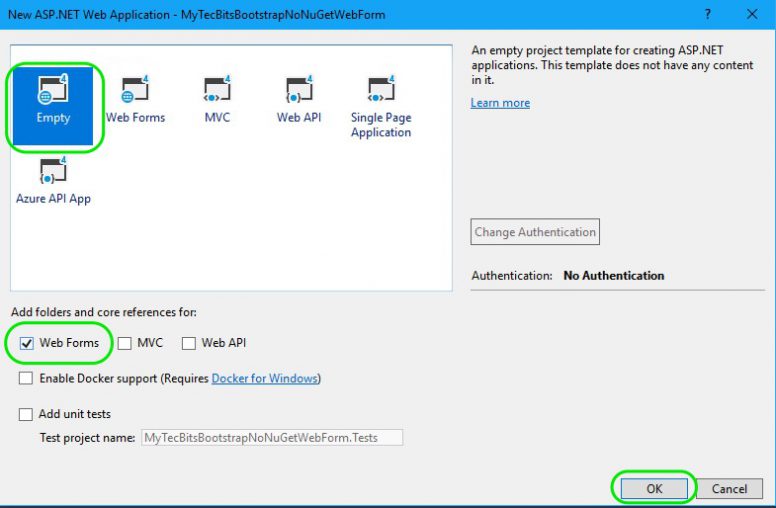
- In the next screen, New ASP.NET Web Application, select Web Forms under Templates and press OK button.
- The ASP.NET Web Forms project is now created.
- To check the bootstrap version, right-click the solution in solution explorer and select Manage NuGet Packages For Solution…. In the Manage NuGet Window, look for bootstrap package and select it. In the right panel, you can see that the installed version of bootstrap is 3.0.0 and the latest stable version is higher than that. In my case the latest stable version is 4.0.0.
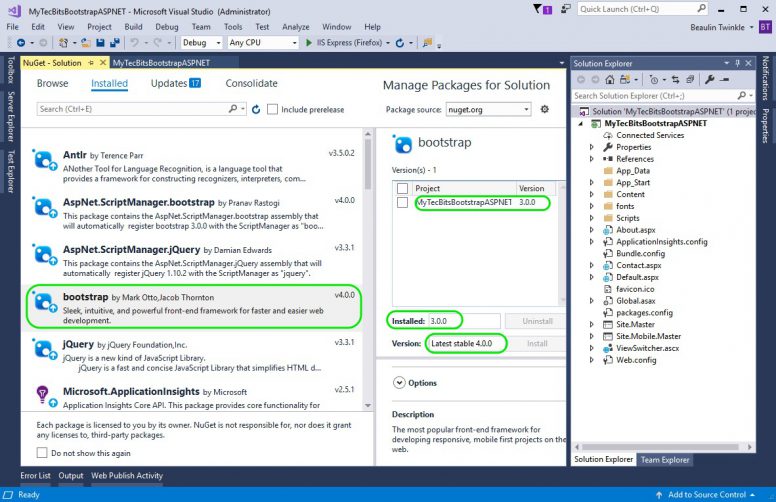
- To upgrade the bootstrap to the latest stable version, select the project name in the right panel of NuGet screen and press the Install button next to the latest stable version number.
- Along with the nugget package, a dependent package poppers.js is installed and other already installed dependent package like AspNet.ScriptManager.bootstrap, jQuery and AspNet.ScriptManager.jQuery are upgraded to the versions compactable with bootstrap.
- Now the bootstrap and its dependency packages are upgraded and ready for usage. If you want, you can upgrade all the other NuGet packages like WebGrease, Respond, Antlr, etc.. to their latest versions. It’s always a good practice to use the latest versions of the software when starting a new web project.
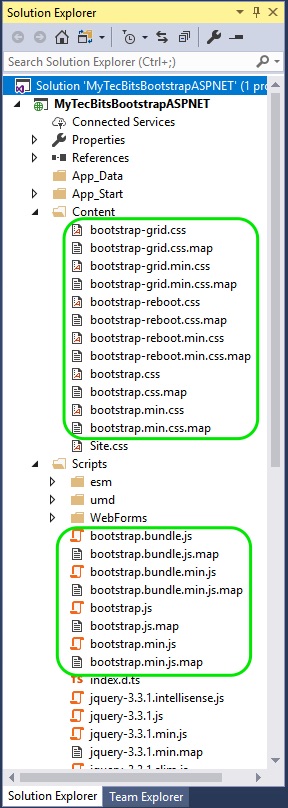
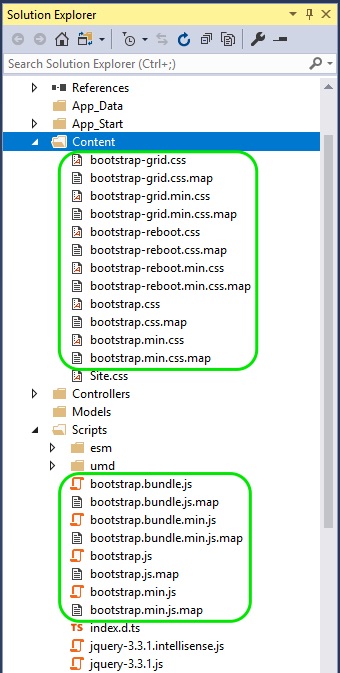
- If you want to see the bootstrap files in your project, expand the Content and Scripts folders. They are as shown in the below screen shot.
- Now, go to Site.Master file and add the reference to popper.js either directly or by using BundleConfig and ScriptReference. (NOTE: Popper.js is needed only if you are using tooltips, popovers or dropdowns in bootstrap).
- As I’ve mentioned earlier, the default user interface of the project is bootstrap. If you notice the code in the Site.Master file, you ca see the bootstrap template with bootstrap navigation bar (navbar) and container. But, this code is for the older version of bootstrap. Bootstrap 4 will not support some of these code, especially the navbar. Navs and navbars are completely re-written in bootstrap 4. So, you have to change the navbar section. Remove the below shown navbar section from the Site.Master file.
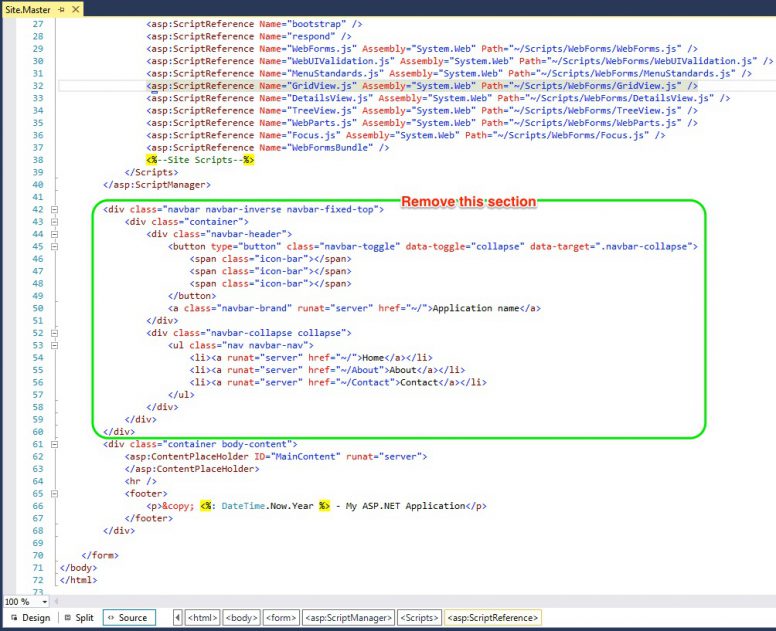
- Use the below code, instead of the old navbar code .
<nav class=”navbar navbar-expand-md navbar-dark fixed-top bg-dark”>
<a class=”navbar-brand” href=”#”>MyTecBits.com</a>
<button class=”navbar-toggler collapsed” type=”button” data-toggle=”collapse” data-target=”#navbar” aria-controls=”navbar” aria-expanded=”false” aria-label=”Toggle navigation”>
<span class=”navbar-toggler-icon”></span>
</button>
<div id=”navbar” class=”navbar-collapse collapse”>
<ul class=”navbar-nav mr-auto”>
<li class=”nav-item active”><a class=”nav-link” href=”/Default.aspx”>Home</a></li>
<li class=”nav-item”><a class=”nav-link” href=”#about”>About</a></li>
<li class=”nav-item”><a class=”nav-link” href=”#contact”>Contact</a></li>
<li class=”nav-item dropdown”>
<a class=”nav-link dropdown-toggle” href=”#” data-toggle=”dropdown” aria-haspopup=”true” aria-expanded=”false” id=”dropdown04″>Dropdown <span class=”caret”></span></a>
<div class=”dropdown-menu” aria-labelledby=”dropdown04″>
<a class=”dropdown-item” href=”#”>Action</a>
<a class=”dropdown-item” href=”#”>Another action</a>
<a class=”dropdown-item” href=”#”>Something else here</a>
</div>
</li>
</ul>
</div>
</nav> - The bootstrap grid system is handled in the aspx files. For example, if you open the Default.aspx file, you can see the grids and columns of bootstrap.
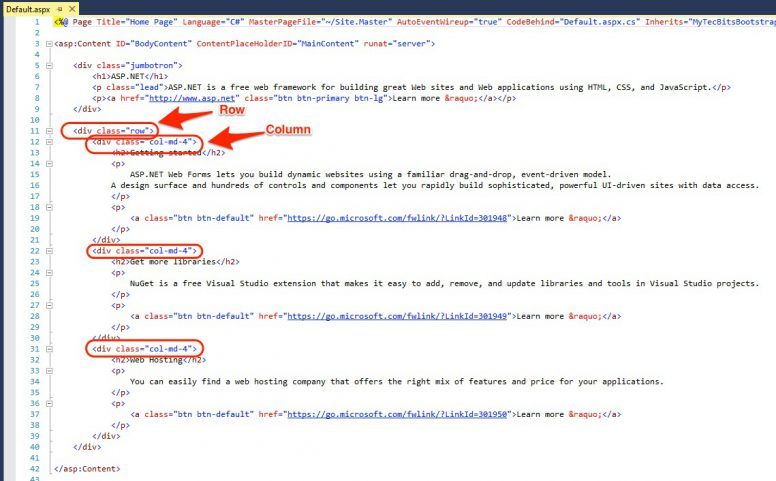
Now you can develop your ASP.NET web forms application using bootstrap user interface. To know more about using the bootstrap classes with server-side HTML controls and Web Form Controls see the section below ↓.
B. Steps To Add Bootstrap In ASP.NET Web Forms (Manual – Without NuGet)
As you have seen in the previous section, if you create a web forms project using a default template in visual studio, it will include all the files and dependencies needed for bootstrap through NuGet packages. A basic bootstrap template with navigation bar and the container are created in the Site.Master file, so as you can have your own grid pattern in the aspx file.
But most of the web developer won’t like to create a project from the visual studio’s default templates and components. They would like to start with an empty template and add the required components and references as needed, either from NuGet or manually add them. So, here I’ve given you the step by step instructions for adding bootstrap and it’s dependencies to an Empty ASP.NET Web Forms project manually (without using NuGet packages).
The sample source created for this Bootstrap With ASP.NET Web Forms article is available in GitHub. Get The Source Code
Create An Empty Web Forms Project
- Start Visual Studio. Go to File menu >> New >> Project.
- In the New Project window, go to Installed >> Visual C# >> Web.
- Select ASP.NET Web Application (.NET Framework) and press OK button. (I’ve also selected .NET Framework 4.7.1. It is optional.)
- In the next screen New ASP.NET Web Application, select Empty icon in the project templates section. Also select Web Forms under “Add folders and core references for” section and press OK button.
- The empty ASP.NET Web Forms project is now created.
Add Bootstrap Files To Empty ASP.NET Web Forms project
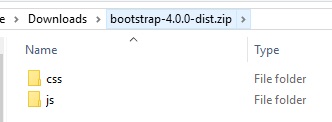
- Download bootstrap’s Compiled CSS and JS files from http://getbootstrap.com.
- Un-zip the downloaded bootstrap file bootstrap-4.0.0-dist.zip.
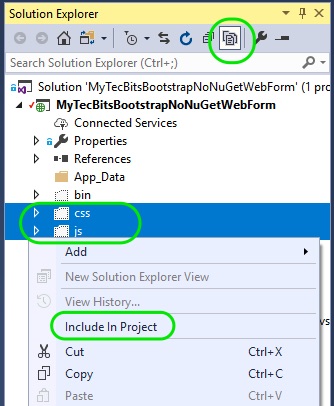
- Copy the folders css and js and paste them to the ASP.NET project folder.
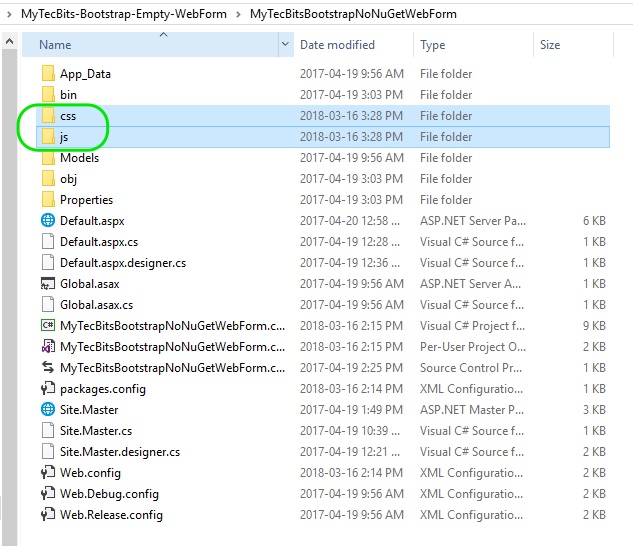
- Go to the visual studio solution explorer and include the folders to the project. (In case if you are not familiar with including the files and folders to project. (a) Select the project and press the Show All Files icon. (b) The bootstrap folders which we have pasted to the project folder will be visible now. Select the folders css, fonts and js and right-click. From the right-click menu, select Include in Project. The folders are included in the ASP.NET project.)
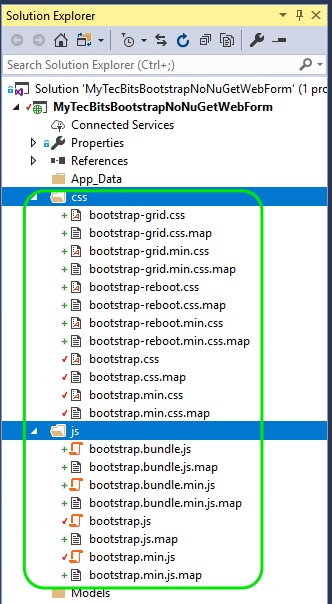
- Now, you have to add the dependencies of bootstrap. Bootstrap needs jQuery and and Popper.js. Version 4 of bootstrap supports jQuery version 3 or higher and popper.js version 1.12.9 or higher.
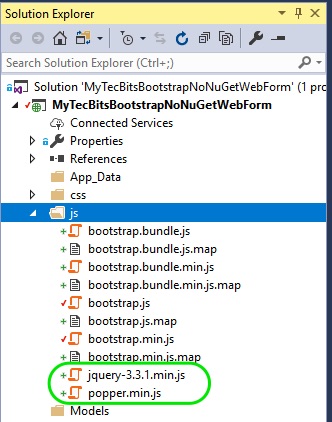
- Download minified jQuery core 3.3.1 from https://code.jquery.com/jquery-3.3.1.min.js.
- Download minified popper js 1.14.1 from https://unpkg.com/popper.js/dist/umd/popper.min.js.
- Place the file jquery-3.3.1.min.js and popper.min.js under the project’s js folder. Include the files to the project, just like how we have included the bootstrap files.
Using Bootstrap In ASP.NET Web Forms
The bootstrap framework is now ready to be used in the project. To use the bootstrap in the project, you have to add a bootstrap template. Bootstrap template is nothing but the bootstrap navigation bar and container. In ASP.NET web forms you can add the bootstrap navbar and container in a master page and use the master page for other aspx files.
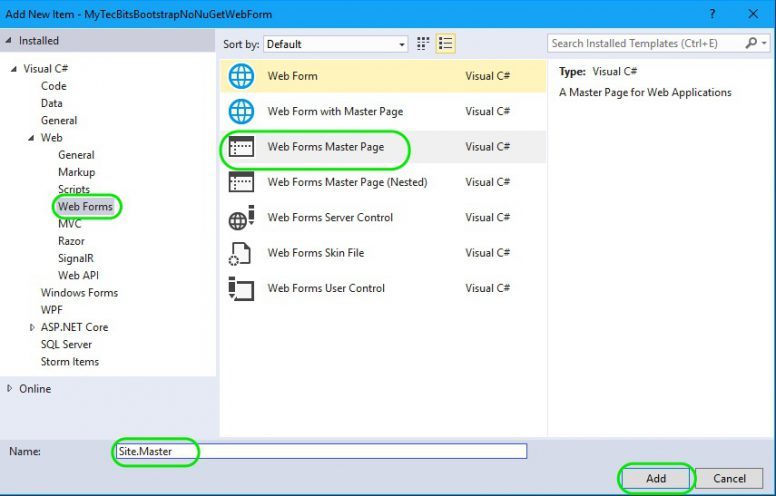
- Add a new Master page and name it Site.Master.
- In the Site.Master file, add these 3 meta tag in the head section. These 3 meta tags should come first in the head section.
<meta charset=”utf-8″>
<meta http-equiv=”X-UA-Compatible” content=”IE=edge”>
<meta name=”viewport” content=”width=device-width, initial-scale=1″> - Add the css file reference to the head section below the meta tags. (NOTE: I’m not going to use bundling technique for the css and js files, as they are out of scope of this article. Just like any other css and js file you can bundle the bootstrap css and js files and use them.)
<link href=”css/bootstrap.min.css” rel=”stylesheet”>
- Add the jQuery, popper and Bootstrap js file reference just above the closing body tag.
<script src=”js/jquery-3.3.1.min.js”></script>
<script src=”js/popper.min.js”></script>
<script src=”js/bootstrap.min.js”></script> - Add the navigation bar in the body section. Below is a sample fixed navigation bar. This navbar is fixed to the top. You can have any type of navigation bars you want. Some examples template are in the bootstrap website.
<nav class=”navbar navbar-expand-md navbar-dark fixed-top bg-dark”>
<a class=”navbar-brand” href=”#”>MyTecBits.com</a>
<button class=”navbar-toggler collapsed” type=”button” data-toggle=”collapse” data-target=”#navbar” aria-controls=”navbar” aria-expanded=”false” aria-label=”Toggle navigation”>
<span class=”navbar-toggler-icon”></span>
</button>
<div id=”navbar” class=”navbar-collapse collapse”>
<ul class=”navbar-nav mr-auto”>
<li class=”nav-item active”><a class=”nav-link” href=”/Default.aspx”>Home</a></li>
<li class=”nav-item”><a class=”nav-link” href=”#about”>About</a></li>
<li class=”nav-item”><a class=”nav-link” href=”#contact”>Contact</a></li>
<li class=”nav-item dropdown”>
<a class=”nav-link dropdown-toggle” href=”#” data-toggle=”dropdown” aria-haspopup=”true” aria-expanded=”false” id=”dropdown04″>Dropdown <span class=”caret”></span></a>
<div class=”dropdown-menu” aria-labelledby=”dropdown04″>
<a class=”dropdown-item” href=”#”>Action</a>
<a class=”dropdown-item” href=”#”>Another action</a>
<a class=”dropdown-item” href=”#”>Something else here</a>
</div>
</li>
</ul>
</div>
<!–/.nav-collapse –>
</nav>
- Wrap the asp:ContentPlaceHolder in the body section with the bootstrap container class. To do this add the container class (class=”container body-content”) to the div element surrounding the content place holder. Another best practice to change the ID of the content placeholder to something meaningful like BodyContent.

- Add the footer section inside the container section.
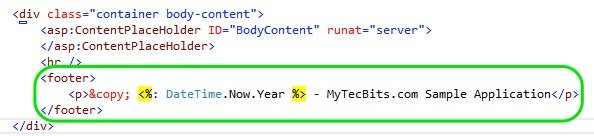
- To fine tune the look and feel, I’ve added a padding space style to the body tag (style=”padding-top: 70px;”). You can move this styling to a separate css file when you start development.
- The Site.Master page code looks like this (in GitHub).
- Now, add a default page Default.aspx to the project.
- In the Default.aspx page, remove all the content except the @ Page directive in the 1st line.
- In @ Page directive add MasterPageFile=”~/Site.Master”. This is to attach the current page to the master page.
<%@ Page Language=”C#” AutoEventWireup=”true” CodeBehind=”Default.aspx.cs” Inherits=”MyTecBitsBootstrapNoNuGetWebForm.Default” MasterPageFile=”~/Site.Master” %>
- Then you can add the grid pattern as you like and add your content. Use the asp:Content tag to wrap all the content to be displayed in the Site.Master’s body content placeholder. The sample content of the default page is here (in GitHub).
To know more about using the bootstrap classes with server-side HTML controls and Web Form Controls see the section below.
Sample ASP.NET Web Forms Source Code
The sample project is available in GitHub: https://github.com/mytecbits/MyTecBits-Bootstrap-Empty-WebForm
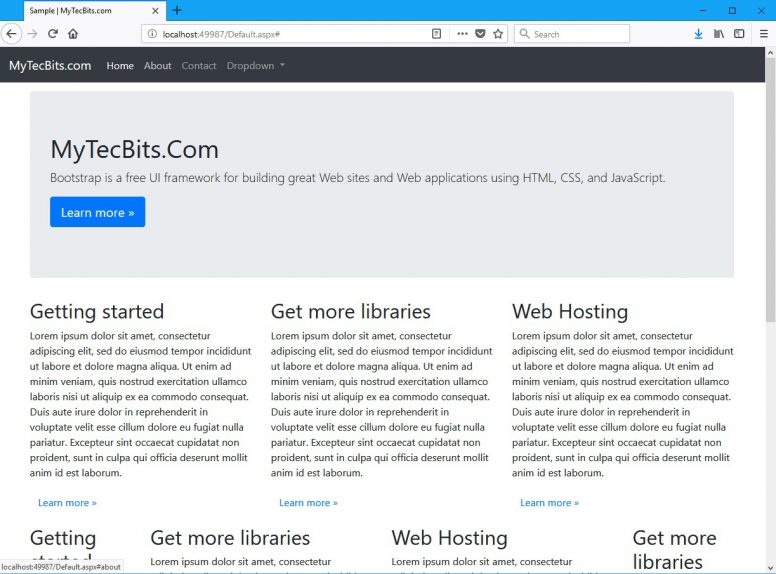
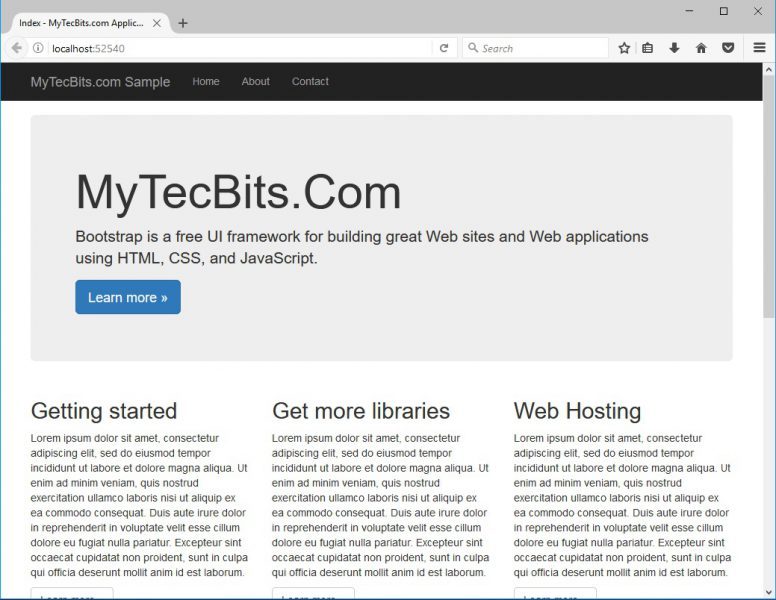
Web Page In Desktop Mode
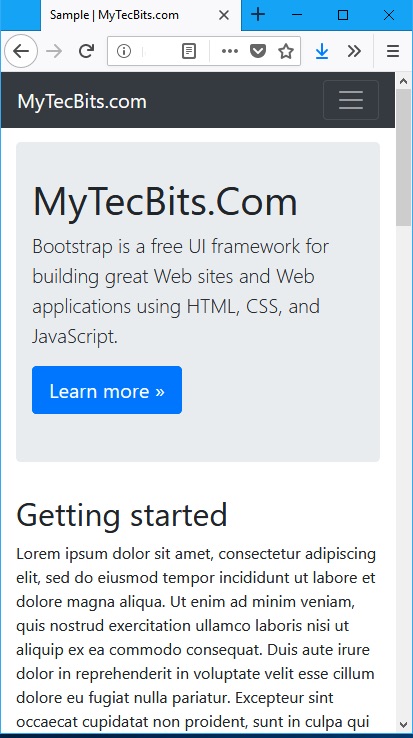
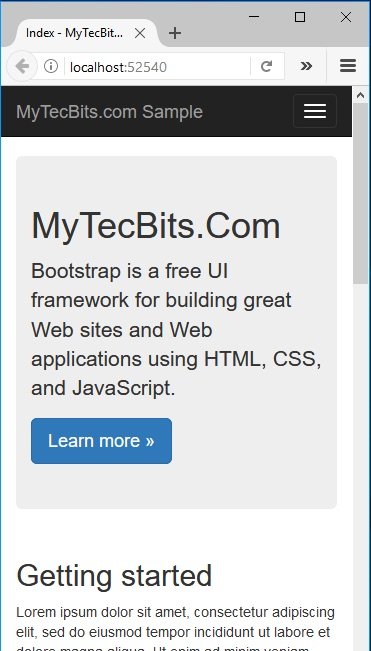
Web Page In Mobile Mode
C. Steps To Add Bootstrap In ASP.NET MVC (Using NuGet)
So far we have seen how to add Bootstrap in ASP.NET Web Forms. Now, we will see how to add it in an MVC Project.
If you are creating a MVC 5 project using the default MVC template in Visual Studio 2015 or higher, Bootstrap will be already included in the project through a NuGet package. But the default bootstrap will be of older version, say 3.0.0. You have to upgrade the Bootstrap NuGet package to add the latest version of bootstrap in your MVC project.
To upgrade bootstrap, follow these steps.
- Launch Visual Studio and go to File >> New >> Project.
- In the New Project window, go to Installed >> Visual C# >> Web.
- Select ASP.NET Web Application (.NET Framework), enter the name of the project and press OK button.(I’ve also selected .NET Framework 4.7.1. It is optional.)
- In the next screen New ASP.NET Web Application, select MVC icon under top Templates section and press OK button.
- The ASP.NET MVC project is now created with the default template.
- To check the bootstrap version, right-click the solution in solution explorer and select Manage NuGet Packages For Solution…. In the Manage NuGet Window, look for bootstrap package and select it. In the right panel, you can see that the installed version of bootstrap is 3.0.0 and the latest stable version is higher that. In this case the latest stable version is 4.0.0.

- To upgrade the bootstrap to the latest stable version, select the project name in the right panel of NuGet screen and press the Install button next to the latest stable version number.
- Along with the bootstrap package, a dependent package poppers.js is installed and other pre-installed dependent package jQuery is upgraded to the version which is compactable to bootstrap.
- Now the bootstrap and it’s dependencies are upgraded and ready to be used. It will be a good practice to upgrade all the other NuGet packages like jQuery, Antlr, etc.. to their latest stable versions.
- If you want to verify the bootstrap files in your project, expand the Content and Scripts folders. They are as shown in the below screen shot.
- As I’ve mentioned earlier, the default user interface of the project is bootstrap. If you check the code in the ../Views/Shared/_Layout.cshtml file, you ca see the bootstrap template with bootstrap navbar and container. But, this code is for version 3 of bootstrap. With upgraded version of bootstrap, this navbar code will not work. You have to change the navbar code with the bootstrap 4. Below is the section of the old navbar, you have to remove.
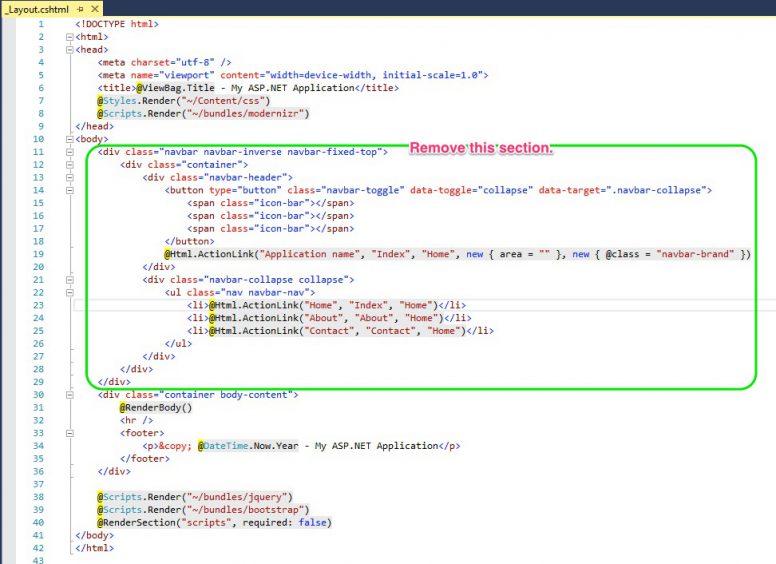
- Instead of the old one, add the below navbar code.
<nav class=”navbar navbar-expand-md navbar-dark fixed-top bg-dark”>
@Html.ActionLink(“www.MyTecBits.com”, “Index”, “Home”, new { area = “” }, new { @class = “navbar-brand” })
<button class=”navbar-toggler collapsed” type=”button” data-toggle=”collapse” data-target=”#navbar” aria-controls=”navbar” aria-expanded=”false” aria-label=”Toggle navigation”>
<span class=”navbar-toggler-icon”></span>
</button>
<div id=”navbar” class=”navbar-collapse collapse”>
<ul class=”navbar-nav mr-auto”>
<li class=”nav-item active”>@Html.ActionLink(“Home”, “Index”, “Home”, new { area = “” }, new { @class = “nav-link” })</li>
<li class=”nav-item”>@Html.ActionLink(“About”, “About”, “Home”, new { area = “” }, new { @class = “nav-link” })</li>
<li class=”nav-item”>@Html.ActionLink(“Contact”, “Contact”, “Home”, new { area = “” }, new { @class = “nav-link” })</li>
</ul>
</div>
</nav> - Do not forget to open the App_Start >> BundleConfig.cs file and add the popper.js file to the bundle or add a reference of popper.js to the _Layout.cshtml file.
- The bootstrap grid system is handled in the views. For example, if you open a view ../Views/Home/Index.cshtml, you can see the grids and columns of bootstrap.
To know more about using the bootstrap classes with server-side HTML controls and MVC’s HTML Helpers see the section below.
D. Steps To Add Bootstrap In ASP.NET MVC (Manual – Without NuGet)
Here I’ve given you the step by step instructions for adding bootstrap and it’s dependencies to an Empty ASP.NET MVC project manually, without using Bootstrap NuGet package.
The sample source created for this Bootstrap With MVC article is available in GitHub. Get The Source Code
Create An Empty MVC Project
- Start Visual Studio. Go to File menu >> New >> Project.
- In the New Project window, go to Installed >> Visual C# >> Web.
- Select ASP.NET Web Application (.NET Framework) and press OK button. (I’ve also selected .NET Framework 4.7.1. It is optional.)
- In the next screen New ASP.NET Web Application, select Empty icon under templates section. Also select MVC under “Add folders and core references for” section and press OK button.

- The empty MVC project is now created.
Add Bootstrap Files To Empty MVC project
- Download bootstrap Compiled CSS and JS files from http://getbootstrap.com.
- Un-zip the downloaded bootstrap file bootstrap-4.0.0-dist.zip.
- Copy the folders css, and js from the downloaded zip file and paste them to the MVC project folder.
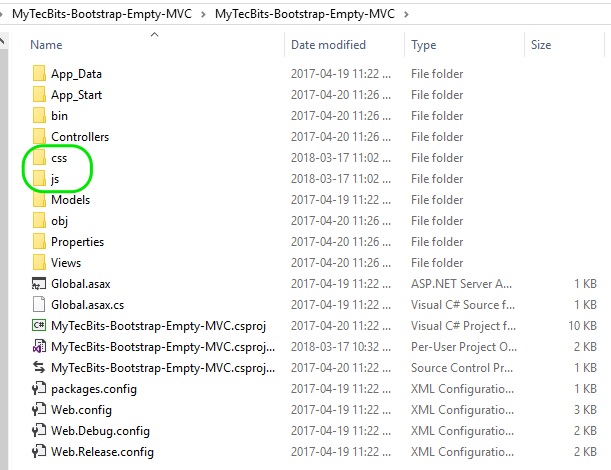
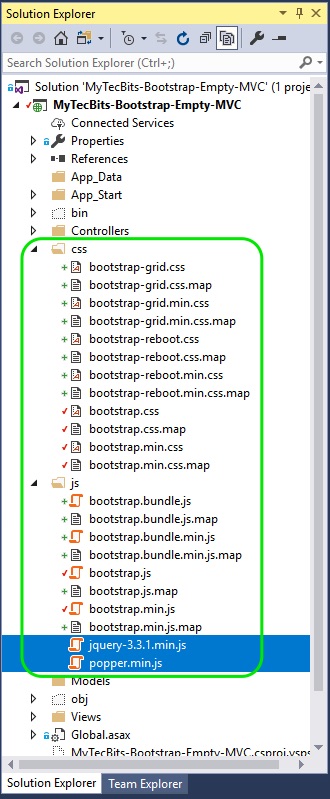
- Go to the visual studio solution explorer and include the folders to the project. (In case if you are not familiar with including the files and folders to a project: (a) Select the project in solution explorer and press the Show All Files icon. (b) The bootstrap folders which we have pasted to the project folder will be visible in doted lines now. Select the folders css and js and right-click. From the right-click menu, select Include in Project. The folders are included in the MVC project.)
- Now we will add the dependencies of bootstrap. Bootstrap 4 needs jQuery version 3 or higher and popper.js version 1.12.9 or higher.
- Download minified jQuery core 3.3.1 from https://code.jquery.com/jquery-3.3.1.min.js.
- Download minified popper.js 1.14.1 from https://unpkg.com/popper.js/dist/umd/popper.min.js.
- Place the file jquery-3.3.1.min.js and popper.min.js under the project’s js folder. Include the files to the project, just like how we have included the bootstrap files.
- Now the folders and files in the solution explorer looks like this.
Using Bootstrap In MVC
Bootstrap framework is now ready to be used in the MVC project. To use the bootstrap in the project, you have to add a bootstrap template. Bootstrap template is nothing but the bootstrap navigation bar and container.
In a MVC project you can add the navigation bar and container in the Layout file and the bootstrap grid and column system in the views. Follow these steps to implement the template.
- Create a folder named Shared under Views.
- Under the Shared folder, add a layout page named _Layout.cshtml.
- Remove the content in the _Layout.cshtml file and paste the below code. See the highlighted part of the code below. The first block has the 3 meta tags which are required for bootstrap. These 3 meta tags should immediately follow the <head> tag. The next part in the head section is the bootstrap’s css file reference. In the body tag, we will have the navigation bar defined by the class navbar. Then the @RenderBody() is wrapped by the bootstrap’s container class. Finally, we have the script reference for the jQuery and Bootstrap js file. (NOTE: I’m not using the bundling technique for the css and js files in this article. Just like any other css and js file you can bundle the bootstrap css and js files using bundle config and use the @Style.Render and @Script.Render to include the bundled files.) The content of _Layout.cshtml is also available here in GitHub.
<!DOCTYPE html>
<html>
<head>
<meta charset=”utf-8″>
<meta http-equiv=”X-UA-Compatible” content=”IE=edge”>
<meta name=”viewport” content=”width=device-width, initial-scale=1″><title>@ViewBag.Title – MyTecBits.com Application</title>
<link href=”/css/bootstrap.min.css” rel=”stylesheet”>
</head>
<body style=”padding-top: 70px;”><nav class=”navbar navbar-expand-md navbar-dark fixed-top bg-dark”>
@Html.ActionLink(“www.MyTecBits.com”, “Index”, “Home”, new { area = “” }, new { @class = “navbar-brand” })
<button class=”navbar-toggler collapsed” type=”button” data-toggle=”collapse” data-target=”#navbar” aria-controls=”navbar” aria-expanded=”false” aria-label=”Toggle navigation”>
<span class=”navbar-toggler-icon”></span>
</button>
<div id=”navbar” class=”navbar-collapse collapse”>
<ul class=”navbar-nav mr-auto”>
<li class=”nav-item active”>@Html.ActionLink(“Home”, “Index”, “Home”, new { area = “” }, new { @class = “nav-link” })</li>
<li class=”nav-item”><a class=”nav-link” href=”#”>About</a></li>
<li class=”nav-item”><a class=”nav-link” href=”#”>Contact</a></li>
</ul>
</div>
</nav>
<div class=”container body-content”>
@RenderBody()
<hr />
<footer>
<p>© @DateTime.Now.Year – My ASP.NET Application</p>
</footer>
</div><script src=”/js/jquery-3.3.1.min.js”></script>
<script src=”/js/popper.min.js”></script>
<script src=”/js/bootstrap.min.js”></script>
@RenderSection(“scripts”, required: false)
</body>
</html> - Create another layout file, under Views and name it _ViewStart.cshtml.
- Remove all the content in the _ViewStart.cshtml file and paste the below code. This is just to specify the Layout file while rendering of the views.
@{
Layout = “~/Views/Shared/_Layout.cshtml”;
} - Now you have to create a view, which will have the bootstrap’s grid and column classes.
- Right click the Controllers folder. From the right-click menu select Add >> Controller.
- From the Add Scaffold pop-up window, Select MVC 5 Controller with read/wright actions.
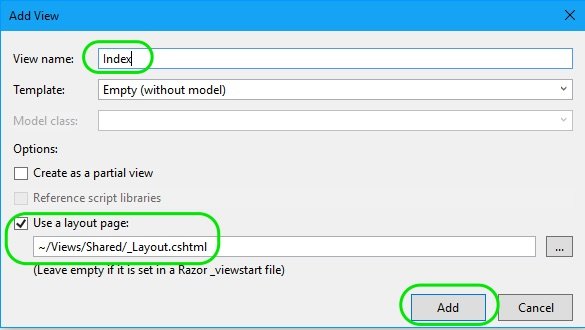
- Name the controller as HomeController. The HomeController.cs controller class file is created under the Controllers folder. A sub-folder named Home is also created under the Views folder.
- Now, add a view named Index under the Home folder. When adding a view make sure to select the layout page you have created earlier.
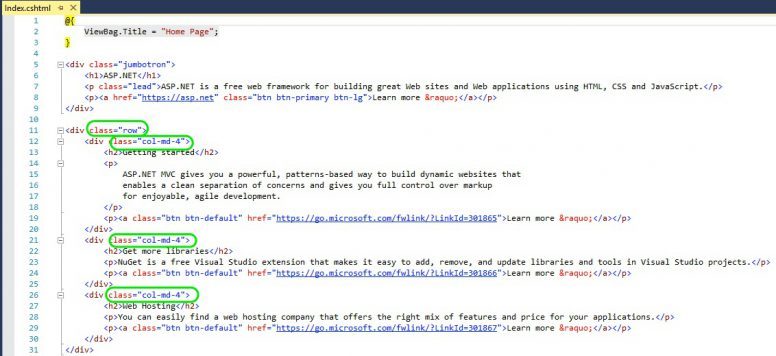
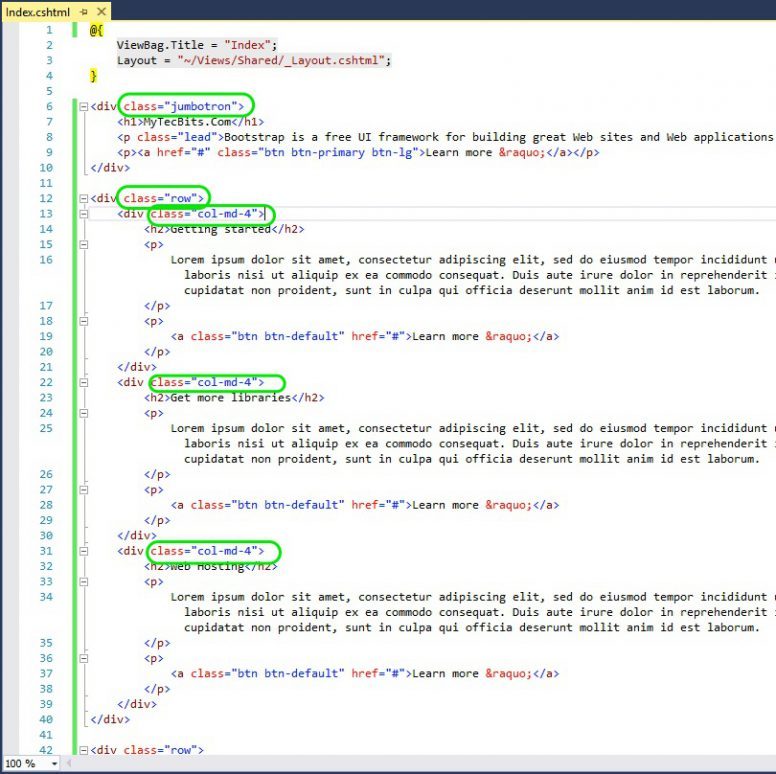
- In the Index.cshtml view page, you can do the bootstrap grid layout using row and column classes. Below is the sample content, I’ve added to the index view.
To know more about using the bootstrap classes with server-side HTML controls and MVC’s HTML Helpers see the section below.
Sample ASP.NET MVC Source Code
The sample MVC project is available in GitHub: https://github.com/mytecbits/MyTecBits-Bootstrap-Empty-MVC
MVC Web Page In Desktop Mode
MVC Web Page In Mobile Mode
E. Adding Bootstrap in ASP.NET from CDN
Bootstrap is also available at several content delivery networks (CDN). The recommended CDN for bootstrap is MaxCDN. To add the bootstrap in your ASP.NET project (both MVC and Web Forms), use the below cdn references instead of downloading and adding it to your project. Using CDN will help you to improve the performance of your web page, but the disadvantage is, you have to be connected to internet for this to work, even in development or production environment.
In <head> section before any other head content:
<meta charset=”utf-8″>
<meta http-equiv=”X-UA-Compatible” content=”IE=edge”>
<meta name=”viewport” content=”width=device-width, initial-scale=1″>
<link rel=”stylesheet” href=”https://maxcdn.bootstrapcdn.com/bootstrap/4.0.0/css/bootstrap.min.css” integrity=”sha384-Gn5384xqQ1aoWXA+058RXPxPg6fy4IWvTNh0E263XmFcJlSAwiGgFAW/dAiS6JXm” crossorigin=”anonymous”>
Just before </body> tag:
Bootstrap needs jQuery and popper.js for using some of it’s components. You have call the jQuery and popper.js before referring bootstrap.js.
<!– jQuery first, then Popper.js, then Bootstrap JS –>
<script src=”https://code.jquery.com/jquery-3.2.1.slim.min.js” integrity=”sha384-KJ3o2DKtIkvYIK3UENzmM7KCkRr/rE9/Qpg6aAZGJwFDMVNA/GpGFF93hXpG5KkN” crossorigin=”anonymous”>
<script src=”https://cdnjs.cloudflare.com/ajax/libs/popper.js/1.12.9/umd/popper.min.js” integrity=”sha384-ApNbgh9B+Y1QKtv3Rn7W3mgPxhU9K/ScQsAP7hUibX39j7fakFPskvXusvfa0b4Q” crossorigin=”anonymous”></script>
<script src=”https://maxcdn.bootstrapcdn.com/bootstrap/4.0.0/js/bootstrap.min.js” integrity=”sha384-JZR6Spejh4U02d8jOt6vLEHfe/JQGiRRSQQxSfFWpi1MquVdAyjUar5+76PVCmYl” crossorigin=”anonymous”>
F. Using Bootstrap Classes With ASP.NET Controls
The bootstrap components can be implemented in the web site element using the style sheet classes. In ASP.NET, there are several types of controls like the server-side HTML Controls, Web Form Controls, MVC’s HTML Helpers, etc… Below are few of the examples of using bootstrap classes in different types of controls.
Adding Bootstrap Classes in Server Side HTML Controls
Using bootstrap in server-side HTML controls (with runat = server) is straight forward, you just need to add the class attribute and add the required bootstrap classes in it.
For example, In the input html form control
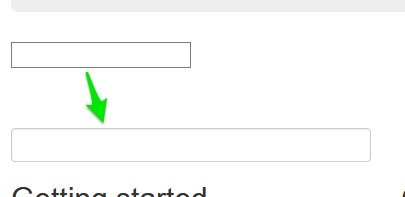
<input type=”text” id=txtFirstName size=25 runat=server>
you can add the bootstrap class (class=”form-control”) like this:
<input type=”text” id=Text1 size=25 runat=server class=”form-control”>
The result will be like this:
You can use the same technique in other server-side html controls like button, textarea, checkbox, radio, select (list box), etc…
Adding Bootstrap Classes in Web Form Controls
Now, we’ll see how to add bootstrap classes to the web form controls like <asp:Label id=Label1 runat=”server”>Label</asp:Label>.
In a web form control you can use the CssClass attribute to add the bootstrap classes to the control.
For example, in the label control
<asp:Label id=Label1 runat=”server”>Warning from MyTecBits.com!…</asp:Label>
you can add the warning alert bootstrap class “alert alert-warning” like this:
<asp:Label id=Label1 runat=”server” CssClass=”alert alert-warning”>Warning from MyTecBits.com!…</asp:Label>
The result will be like this:

Similarly you can use the CssClasses attribute to add the bootstrap classes in other Web Form Controls as well.
While using bootstrap style in GridView control, you have to perform an additional step. The details are available in the article Applying bootstrap styles to GridView control.
Adding Bootstrap Classes in MVC’s HTML Helpers
Adding bootstrap classes to HTML Helpers is simple, but not as straight forward as in Web Form Controls or HTML Server-Side controls. To add style classes to HTML Helpers, you have to overload it. If you want to create a bootstrap link button using the @Html.ActionLink, then you have to overload it with the htmlAttributes object.
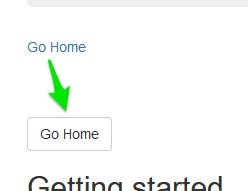
For example, in the action link
@Html.ActionLink(“Go Home”,”Index”,”Home”)
you can add the bootstrap’s button class “btn btn-default” like this:
@Html.ActionLink(“Go Home”, “Index”, “Home”, null, new { @class = “btn btn-default”})
The result will be like this:
Similarly, you can use the htmlAttributes object for the other HTML Helpers like @Html.Label, @Html.Editor, etc…
Related Articles
- Step by step instruction on using Bootstrap Style Sheet version 3 with ASP.NET Web Forms Application without using NuGet Package.
- Detailed instructions on using Bootstrap version 3 with MVC 5 Entity Framework 6 with Data First model along with details on applying bootstrap classes in HTML Helper classes.
thanks a lot, this is so helpful!
Unable to resolve dependencies. ‘bootstrap 5.1.3’ is not compatible with ‘AspNet.ScriptManager.bootstrap 4.6.0 constraint: bootstrap (>= 4.5.9 && < 4.6.1)'. I got this error.
Fantastic to find this site. Thank you very much!
I am installing latest bootstrap version available via Nuget in my VS2015 project. However after successful installation receiving build error
“The build task could not find node.exe which is required to run the TypeScript compiler. Please install Node and ensure that the system path contains its location.”
I google the error but still not able to get it solved. Can you help ?.
Great post! After updating my navbar has has the menu items pushed all the way to the left (as opposed to having some space and it being more aligned with the content), any ideas?
Thank you for this! It worked however the nav bar has all the menu items pushed all the way to the left, any ideas how to fix this?
Just want to say thank you for this article as it guided me to set up bootstrap manually. I totally regretted updating the nugets as it messed up my navigation bar. Luckily I come across this article and managed to fix it.
Hi Kiu Yen Chee,
I’m happy to know this helped you.
Thank you. Have a great day.
Great article.. thank you!
You are welcome.
Great post!
Thanks for sharing
Thank you
Great work , thank you .
Hi,
Thanks for this article, helps me so much.
But now… you can help me to choose a control toolkit for this kind of project?
What control suite it’s the best for this…
Thanks!
actually I was already completed the bootstrap and MVC Core article that you pointed me to it. I guess I’m set then. Thank you
Thank you Beaulin. You have a good day
Beaulin,
1st of all, thank you for taking time to write and responded to my post. I got a non profit “youth leadership camp” online registration that was written in ASP many years ago. I decided to upgrade it to the latest technology but have no idea how to go about it. I ran into your articles and love what bootstrap and MVCCore offered and would like to try it. So again, thank you for your help.
Here is the error that I got from the output windows:
Restoring packages for D:\Development\VCSA\VCSA\VCSA.csproj…
Package AspNet.ScriptManager.bootstrap 3.3.7 is not compatible with netcoreapp1.1 (.NETCoreApp,Version=v1.1). Package AspNet.ScriptManager.bootstrap 3.3.7 supports:
– net40 (.NETFramework,Version=v4.0)
– net45 (.NETFramework,Version=v4.5)
One or more packages are incompatible with .NETCoreApp,Version=v1.1.
Package restore failed. Rolling back package changes for ‘VCSA’.
Time Elapsed: 00:00:01.6568358
========== Finished ==========
Hi Ohyes,
This article is based on regular ASP.NET Web Forms and MVC. This is not based on MVC Core. I believe that’s the reason you are getting the error. For using bootstrap with MVC Core you can follow one of my other article http://www.mytecbits.com/microsoft/dot-net/bootstrap-asp-net-core-mvc. In MVC Core, bootstrap is by default installed through Bower package manager, not through NuGet. Please let me know if you have any questions.
I received “Package restore failed. Rolling back packages changes for “…. name of my solution” when trying to install this step:
“Along with the nugget package, the dependent package AspNet.ScriptManager.bootstrap will also gets upgraded to the latest version.”
Hi Ohyes,
Looks like the error you got usually appears if any of the selected package is incompatible with one of the installed package. Is it possible for you to show a screenshot of the error?