
Here you have a simple step by step illustration for using database in Python Django website. Django web framework comes with a default database. It is SQLite version 3.x. You can see the database file db.sqlite3 under the projects folder. This database is enough for simple websites.
This article is split in to three sections. The defining models section deals with defining the model and it’s properties. The migrating database section illustrates the migration of the additions and changes to the database from the model. Finally in the using database section, you will see how to create a form to enter data to the database and fetching the data from the db and display it in a web page.
Prerequisite
For this illustration, I’m using the sample code generated from my previous article Creating website with Python using VS Code on macOS.
Defining models
To start with, you have to define models. Model is nothing but a collection of classes. Each class will have the definition of a table.
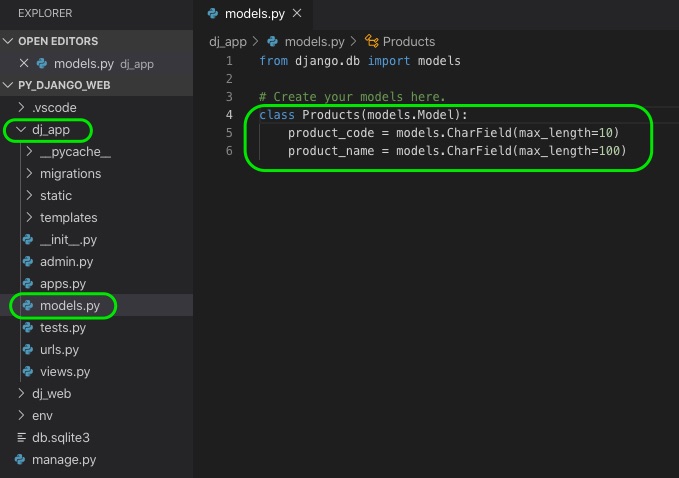
- Open the file models.py under the django web app (In this illustration it is dj_app folder) folder.
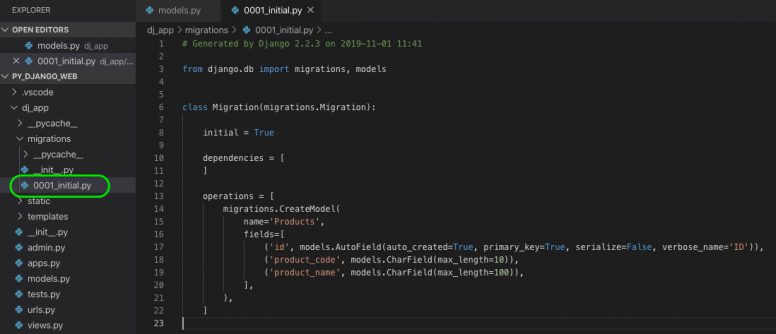
- Add this simple class below the comment # Create your models here. This class is a simple model for a table called Products with two columns named product_code and product_name. You don’t need to create an unique id field. During the migration process, an unique ID field called id will be added to the table. You will see it later.
class Products(models.Model):
    product_code = models.CharField(max_length=10)
    product_name = models.CharField(max_length=100)
Migrating database
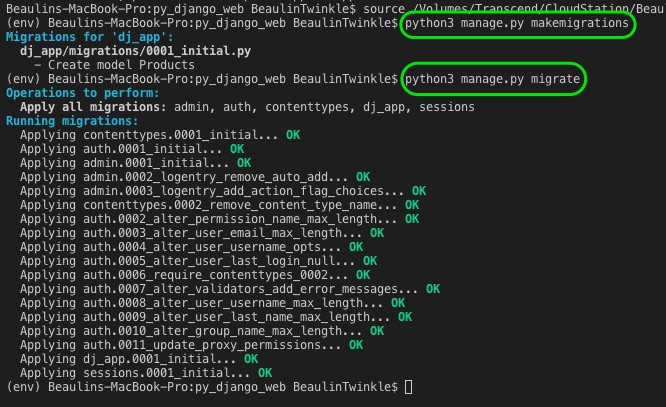
Once you have created or edited the models.py file, you have to migrate the changes to the database. Follow these steps for doing the migration:
- In VS Code Editor, open the Command Palette, by pressing Shift, Command and P keys.
- Search and start Terminal: Create New Integrated Terminal. The terminal panel will open at the bottom.
- Run the below commands in the terminal. The makemigrations command will create a file called 0001_initial.py under the migrations folder. The migrate command will update the sqlite3 database based on the details in the migrations folder.
python3 manage.py makemigrations
python3 manage.py migrate
NOTE: If you want to see the content of the database, then use either an external tool like DB Browser for SQLite or a VS Code extension like vscode-sqlite.
Now, you are ready to use the database in your web app to store, modify and retrieve data.
Using database
Now you will see how to use the database and it’s objects and data in the web pages.
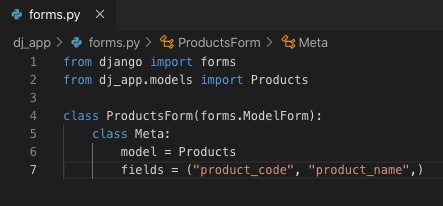
- In the web app folder (dj_app) create a new file called forms.py.
- Add this code in the file.
from django import forms
from dj_app.models import Products

class ProductsForm(forms.ModelForm):
    class Meta:
        model = Products
        fields = ("product_code", "product_name",)
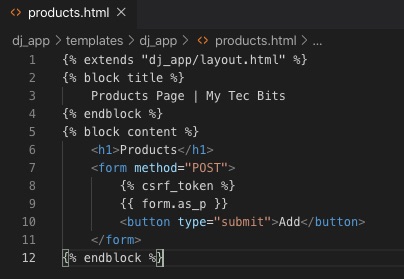
- Open the templates folder /templates/dj_app and open the file products.html which we have already created in the previous article. If the file is not there, then create one.
- Replace the existing code with the below one in the products.html file. In this code, there is a form section. The tag {% csrf_token %} inside the form will protect your site from cross-site request forgery. The {{ form.as_p }} will generate the input fields for the form.
{% extends "dj_app/layout.html" %}
{% block title %}
    Products Page | My Tec Bits
{% endblock %}
{% block content %}
    <h1>Products</h1>
    <form method="POST">
        {% csrf_token %}
        {{ form.as_p }}
        <button type="submit">Add</button>
    </form>
{% endblock %}
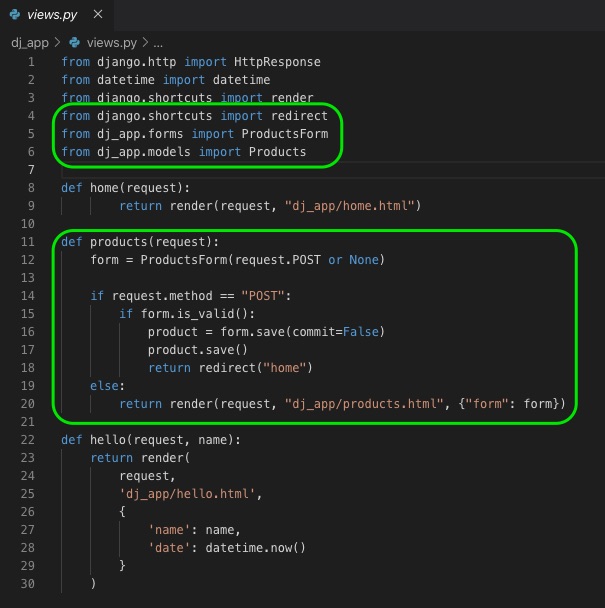
- Open the views.py file under the web app folder dj_app.
- Add the below import statements below the existing import statements.
from django.shortcuts import redirect
from dj_app.forms import ProductsForm
from dj_app.models import Products
- In the same views.py file, replace the products view function with the below code.
def products(request):
    form = ProductsForm(request.POST or None)

    if request.method == "POST":
        if form.is_valid():
            product = form.save(commit=False)
            product.save()
            return redirect("home")
    else:
        return render(request, "dj_app/products.html", {"form": form})
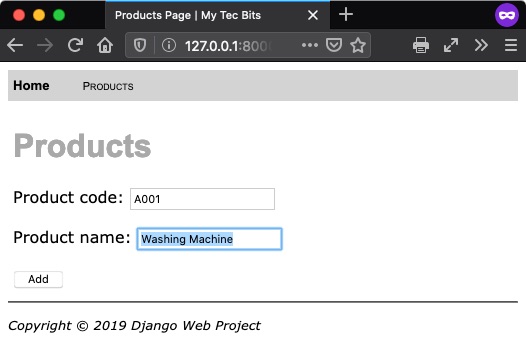
- Run the project either in the debug or non-debug mode and open the homepage in a browser.
- Navigate to the Products page by selecting Products in the nav bar.
- You will see the products form. Enter the product details and submit the form by pressing the Add button. On submitting the form, you will be redirected to the home page.
- Now you have to modify the home page so as to list the products added through the products page.
- Open the home.html template form from /dj_app/templates/dj_app/
- Replace the content inside the block content with the below code.
<h1>List of products</h1>
    {% if products_list %}
        <table>
            <thead>
                <tr>
                    <th>Code</th>
                    <th>Product Name</th>
                </tr>
            </thead>
            <tbody>
                {% for products in products_list %}
                <tr>
                    <td>{{ products.product_code }}</td>
                    <td>{{ products.product_name }}</td>
                </tr>
                {% endfor %}
            </tbody>
        </table>
    {% else %}
        <p>No products have been added. Use the <a href="{% url 'products' %}">Add products form</a>.</p>
    {% endif %}

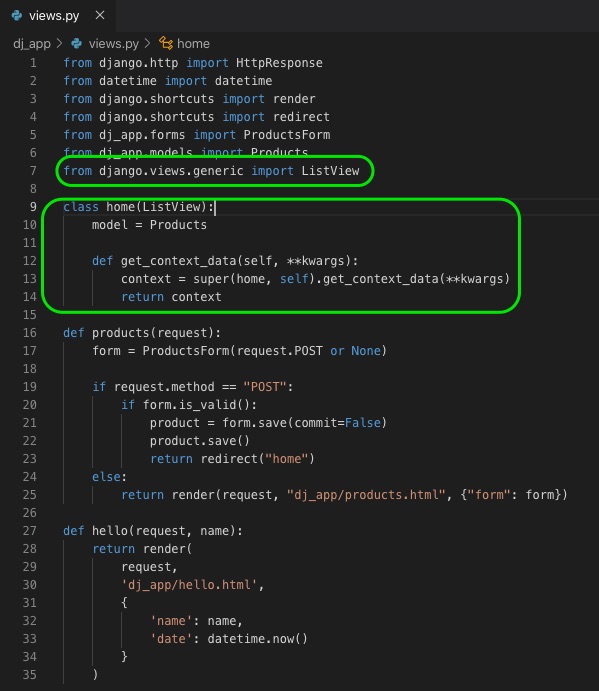
- As you are using ListView to list the products from the database, you have to modify the views.py in web app to import the ListView and modify the home function.
- Open views.py from dj_app folder and add the below import statement below the other import statements.
from django.views.generic import ListView
- In the same file replace the home function with the class code below. This home class uses our products model and implements a context function.
class home(ListView):
    model = Products

    def get_context_data(self, **kwargs):
        context = super(home, self).get_context_data(**kwargs)
        return context
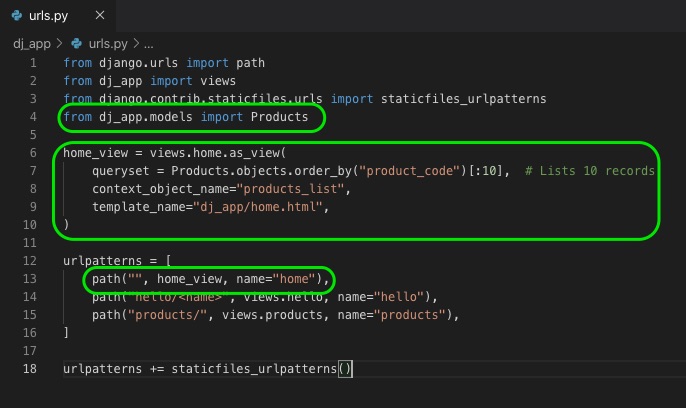
- Now, open the file urls.py from the web app folder.
- Add this statement to import the data model.
from dj_app.models import Products
- Create a variable in the same urls.py file for the home view. Let’s call the variable as home_view. This variable defines a queryset to fetch 10 records from the Products table and sets a name for the context data object which is used in the home template file. It also sets a template page.
home_view = views.home.as_view(
    queryset = Products.objects.order_by("product_code")[:10],
    context_object_name="products_list",
    template_name="dj_app/home.html",
)
- Now, in the same file, change the path to the home page with the variable name (home_view) which we have just created.
path("", home_view, name="home"),
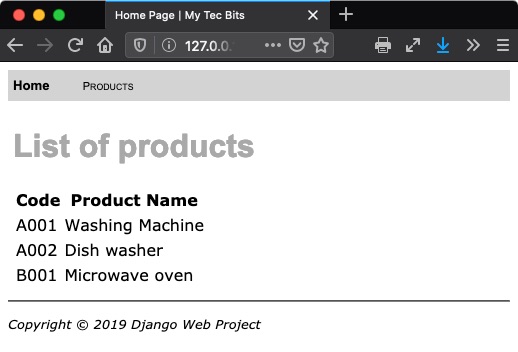
- Finally, run the project and load the home page in a browser. You can see the list of products you have added before.
Tools & technologies used
- Python 3.7.4.
- Django 2.2.6.
- Visual Studio Code 1.39.2.
- macOS Catalina 10.15.
Reference
I have referred visual studio tutorial and created this article in macOS perspective and in a simplified manner.