
In my earlier article I’ve explained my first experiment on implementing and using Bootstrap with ASP.NET Web Forms.
In this article I’m giving the step by step process of creating my first web application having Bootstrap with ASP.NET MVC 4.
Tools and frameworks used:
- Visual Studio Express 2012 for Web.
- Dot Net Framework 4.5.
- MVC 4.
- Bootstrap for MVC 4 NuGet package.
Steps for creating Bootstrap with ASP.NET MVC 4 web application:
- Launch Visual Studio.
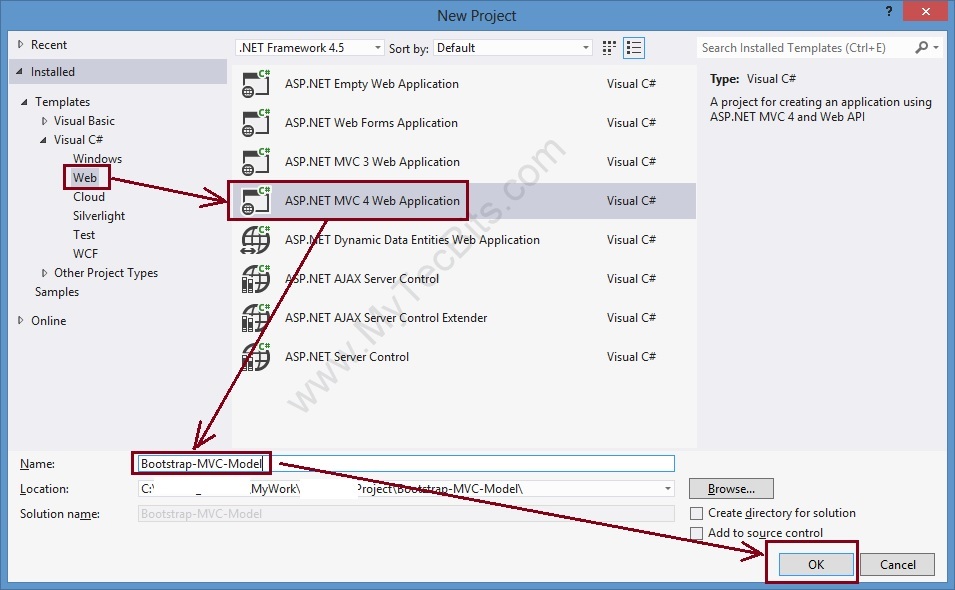
- Go to File menu and select New Project…
- Create a new ASP.NET MVC 4 Web Application project.
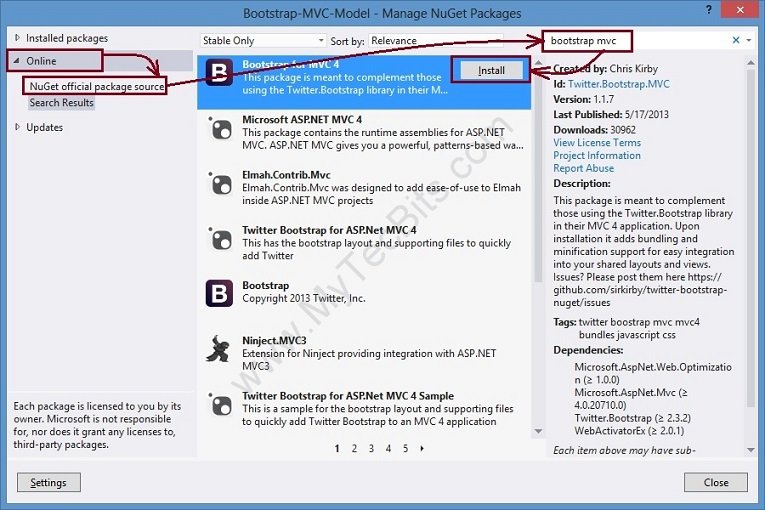
- Go to Solution Explorer –> right-click the project and select Manage NuGet Packages.
- In the Manage Nuget Packages screen, select Online from the left panel, Then NuGet official Package source underneath and search for Bootstrap MVC.
- From the search result list in the center panel, select Bootstrap for MVC 4.
- Click the Install button to install Bootstrap for MVC 4.
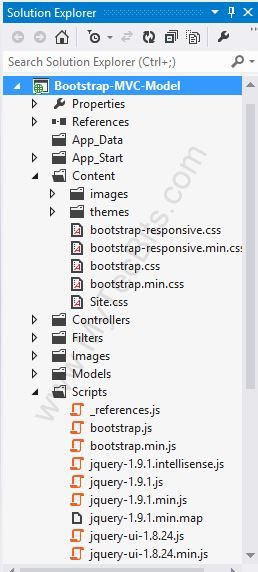
- After the installation process completes check the content folder and the script folder in the solution. The bootstrap CSS and script files will be available.
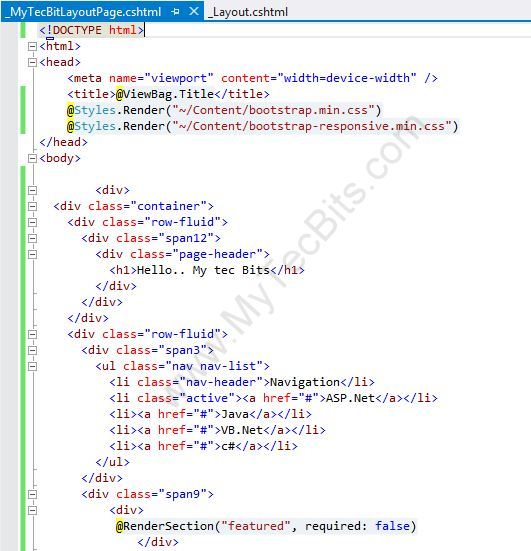
- In the solution explorer, right-click the Shared folder, select Add, select New Item… and create new MVC 4 Layout Page (Razor). Rename the layout page if you want.

- Edit the new layout page and add the below two lines of code below the tag in header section.
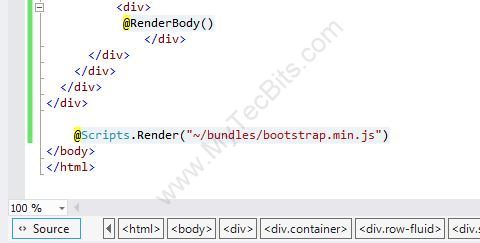
@Styles.Render("~/Content/bootstrap.min.css") @Styles.Render("~/Content/bootstrap-responsive.min.css") - Remove everything in the body tag and add the below code inside the body tag. This code is to create a container with 12 columns. You have to specify the container column size as span12. Then split the main container into two one with 3 columns (span3) for the left navigation section. The remaining column span (span9) for the contents.
</pre> <div> <div class="container"> <div class="row-fluid"> <div class="span12"> <div class="page-header"></pre> </pre> </pre> <h1>Hello.. My tec Bits</h1> <pre> <pre> <pre> </div> </div> </div> <div class="row-fluid"> <div class="span3"> <ul class="nav nav-list"> <li class="nav-header">Navigation</li> <li class="active"><a href="#">ASP.Net</a></li> <li><a href="#">Java</a></li> <li><a href="#">VB.Net</a></li> <li><a href="#">c#</a></li> </ul> </div> <div class="span9"></pre> </pre> </pre> <div>@RenderSection("featured", required: false)</div> <pre> <pre> <pre></pre> </pre> </pre> <div>@RenderBody()</div> <pre> <pre> <pre> </div> </div> </div> </div> <pre> @Scripts.Render("~/bundles/bootstrap.min.js") - The new Layout page looks like this:
- Open the _ViewStart.cshtml page and change the layout page to the newly created layout page.

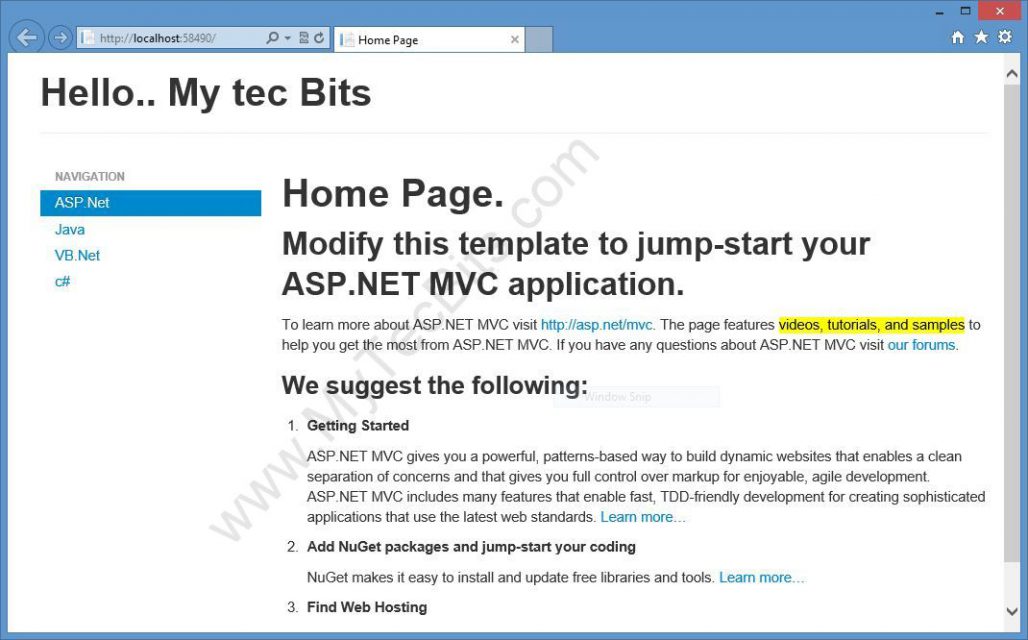
- Now build the MVC solution either by hitting the F5 key or by clicking the green build arrow at the Visual Studio tool bar. On successful build, the web page will be launched in the browser similar to the one shown below.
See the article Twitter Bootstrap with ASP.NET Web Forms for step by step details on creating a AP.NET web forms website using Bootstrap as the user interface.
Very good article. Gave my mistake, I was caught in the Package Manager Console and took a twitter.bootstrap.mvc4 Uninstall-package. After working well. thank you
Following this tutorial in Visual Studio 2012 Professional I also got an unformatted page. The problem was because bootstrap ends up installing the CSS into a subfolder. So the code needs to be changed to @Styles.Render(“~/Content/bootstrap/bootstrap.min.css”) to work.
Thanks for the tutorial.
Following this tutorial step by step in VStudio2010 what I get is an unforrmated page
Hello Ivan,
I’ve created this sample using Visual Studio Express 2012 for Web. I haven’t got a chance to try with VS 2010. Sorry, that haven’t mentioned the VS version details in the article. Now I’ve added them. Thank you for your feedback.
I think it should be @Scripts.Render(“~/bundles/bootstrap”) instead of @Scripts.Render(“~/bundles/bootstrap.min.js”).
In this example, for simplicity, I haven’t registered the bootstrap js and css files to the BundleConfig. That’s the reason I’ve specified the full file name.