
Sometime back, I’ve created a sample MVC 5 application with Bootstrap 3. In that article, I’ve explained how to change the default bootstrap layout. Recently, I got several requests to include MVC controls with bootstrap styling in the example. So, here is another step-by-step article on using Bootstrap 3 with MVC 5 and Entity Framework 6 with Database First workflow, to demonstrate how to use the ASP.NET MVC controls with bootstrap look and feel.

In this step-by-step example, I’ll be using few of the tables and data from WideWorldImporters sample database for SQL Server 2016 using the database first workflow in Entity Framework. If you don’t have SQL Server 2016 or WideWorldImporters sample database, then follow the articles Installing SQL Server 2016 and Installing SQL Server Sample Database to install them.
Overview Of This Article
- Creating a sample MVC 5 project in Visual Studio 2015 using Entity Framework 6 database first workflow.
- Upgrading default Bootstrap and other NuGet packages to the latest stable version.
- Changing the default Bootstrap layout to another.
- Connect a sample database with Entity Framework database first workflow.
- Customizing and styling some of the ASP.NET MVC controls using Bootstrap classes.
Tools & Technologies Used
- Visual Studio Community 2015.
- .Net Framework 4.6.1
- ASP.NET MVC 5.2.3
- Entity Framework 6.1.3 (Database First Workflow)
- Bootstrap 3.3.7
- jQuery 3.1.0
- jQuery.Validation 1.15.1
- SQL Server 2016 Developer Edition
- WideWorldImporters OLTP sample database for SQL Server 2016 Developer Edition
- Microsoft Edge and Chrome Browser
Sample Source Code:
The sample source code, project and solution created with this step-by-step instruction is available in my GitHub repository. Download or fork the sample code from here.
Steps For Using Bootstrap 3 With MVC 5 And Entity Framework 6
I. Creating MVC 5 Project
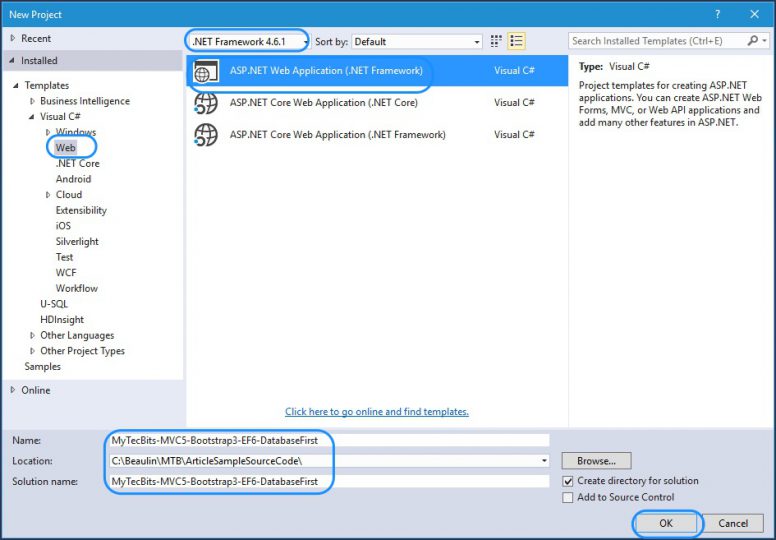
- Launch Visual Studio 2015 (I’ve used Visual Studio Community 2015).
- Go to File menu and select New Project…
- Create a new C#, ASP.NET Web Application (.NET Framework) project With .NET Framework 4.6.1.
- In the next screen, select MVC as the template. Then press the Change Authentication button and change the authentication to No Authentication. Then press OK.
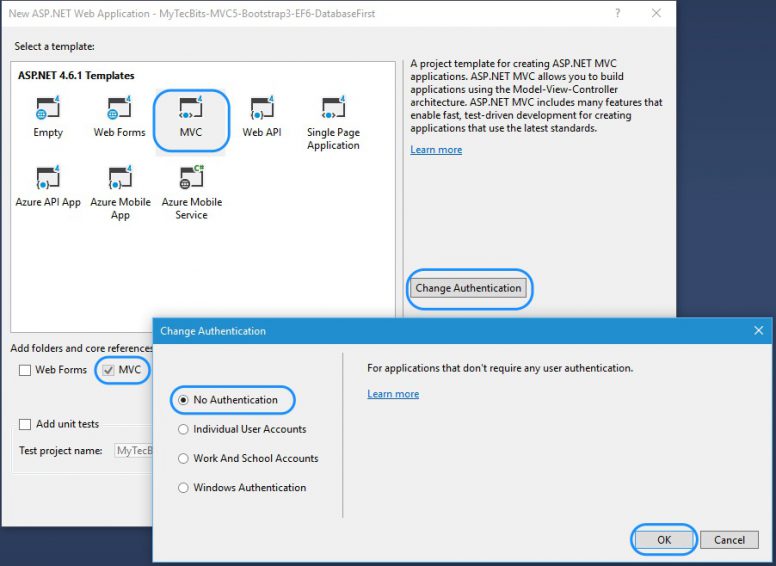
- Press OK In in template selection screen. The MVC 5 project with Bootstrap 3 is now created.
II. Update The Default NuGet Packages
Because we have used the MVC template for creating the project, the project is created with some basic NuGet packages like Bootstrap, jQuery, jQuery.Validation, etc… These packages are in older version. It will be a good practice to upgrade them to the current stable versions before starting any coding in the project. Follow the below steps to update the NuGet packages to the current stable versions.
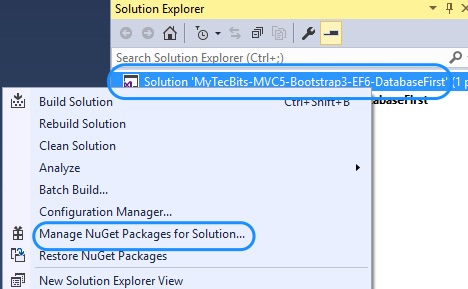
- Right click the solution in solution explorer and select Manage NuGet Packages for Solution...
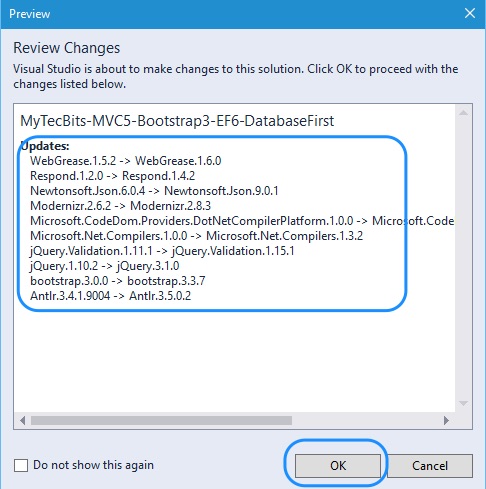
- In the Manage Packages for Solution screen open the Updates section. You will see the list of packages which has update to the latest stable version.
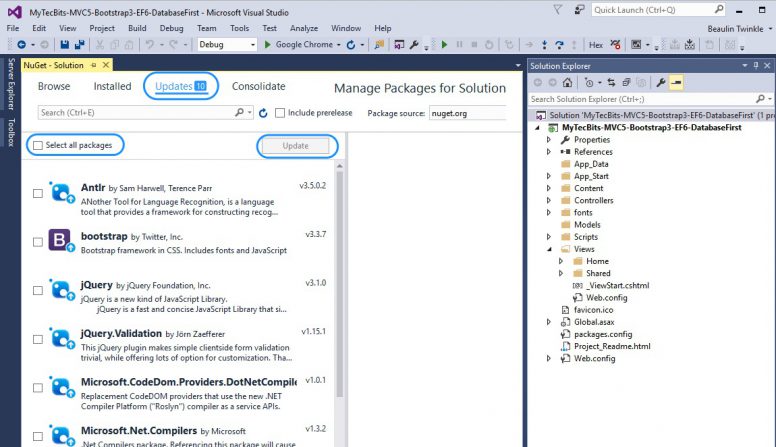
- Select all the packages and press Update button.
- The package manager checks for dependencies and pop-up a window which will have the packages latest versions and their dependencies. Press OK to continue the update process.
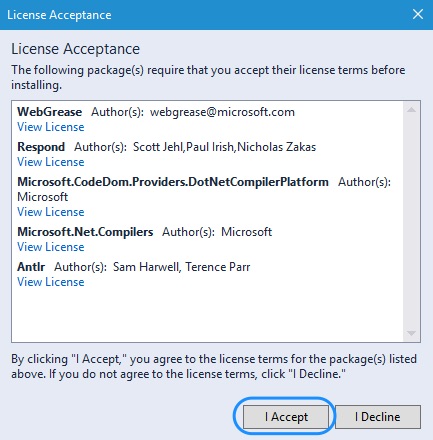
- Accept the license agreements if the License Acceptance screen appears.
- The packages are updated to the corresponding latest stable versions. The older version files are removed from the project. You can see the update status in the output panel.
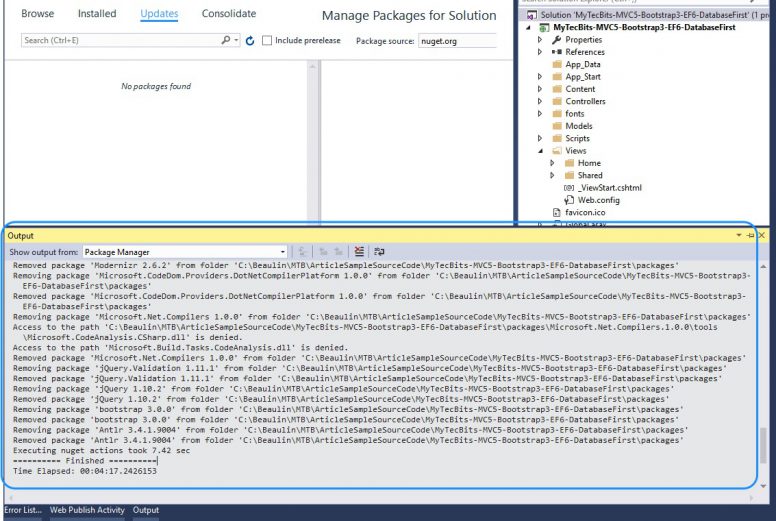
- Some package updates may need the Visual Studio to be restarted. So, it is good to restart the visual studio before proceeding further.
III. Install Entity Framework
- To install Entity Framework, go back to the Manage NuGet Packages for Solution screen and select the Browse panel.
- The Browse panel lists down the top downloaded packages. You can find the EntityFramework package among the top few in the list. If not, you can search for “EntityFramework” using the search box. In the right panel of the screen you can see the version number of the package. Select the EntityFramework package and choose the projects you want the package to install. Then press Install.

- Press OK in the Preview window and Accept the License Agreement.
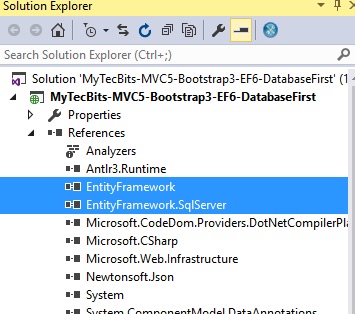
- The EntityFramework (version 6.1.3) package is installed and you can now see the Entity Framework assemblies under the Reference folder in the Solution Explorer.
IV. Changing Bootstrap Layout & Style Of Project
The default bootstrap template used in Visual Studio 2015 is Jumbotron. When you create a project with a template, the layout and the index page will have the Jumbotron layout code, modified to accommodate the MVC structure. Jumpotron’s source code is available here in bootstrap website. For this example, to get used to the bootstrap layout, we’ll change this layout to another one. Let’s use the Justified-Nav template from bootstrap website. You can get the HTML code from bootstrap website. Justified-Nav is also a fluid layout template which will re-align itself for the screen size.
When changing the default bootstrap layout in MVC, you have to understand that the bootstrap layout is segregated into 2 parts. In most cases, head, navigation and the footer section goes to the MVC layout file (_Layout.cshtml). The content part (ie. the bootstrap grid system with row and col) alone goes to the index and other views.
Follow the below steps to change the default Jumbotron layout to Justified-Nav.
- Get the source code of Justified-Nav template from https://getbootstrap.com/docs/3.3/examples/justified-nav/.
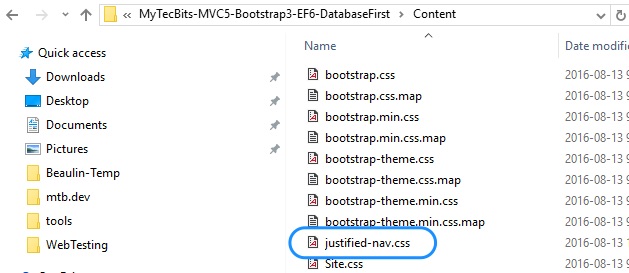
- The Justified-Nav template needs extra style sheet (justified-nav.css). You can get it from the bootstrap website from here. (or you can download it from my GitHub repository)
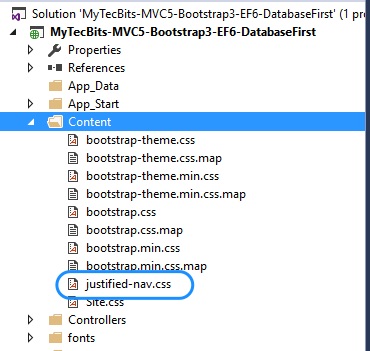
- Place the style sheet justified-nav.css to the Content folder and attach it to the project.
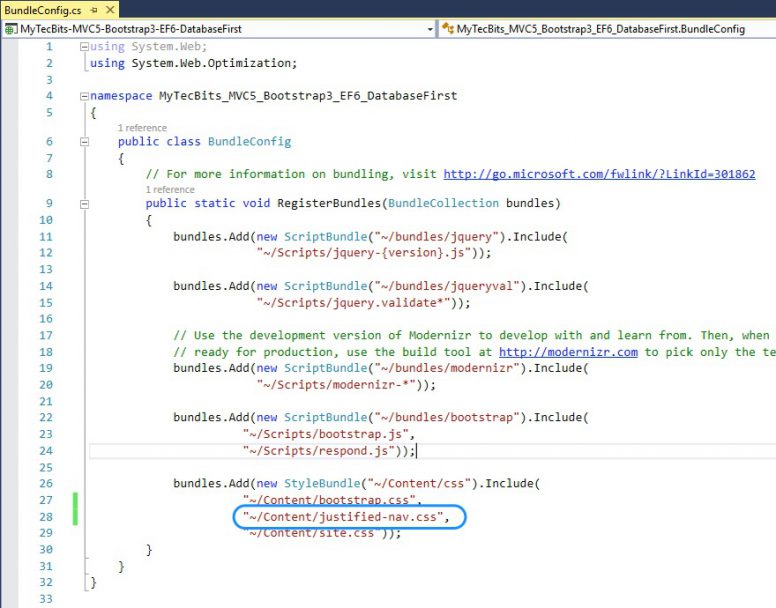
- Open the BundleConfig.cs under the project’s App_Start Folder.
- Add the justified-nav.css to the “~/Content/css” style bundle below the bootstrap.css.
- Now, open the layout file _Layout.cshtml in the Shared folder under Views Folder.
- In the layout file, you have to change only the top navigation part of the bootstrap. For that, remove the section within the <body> tag.
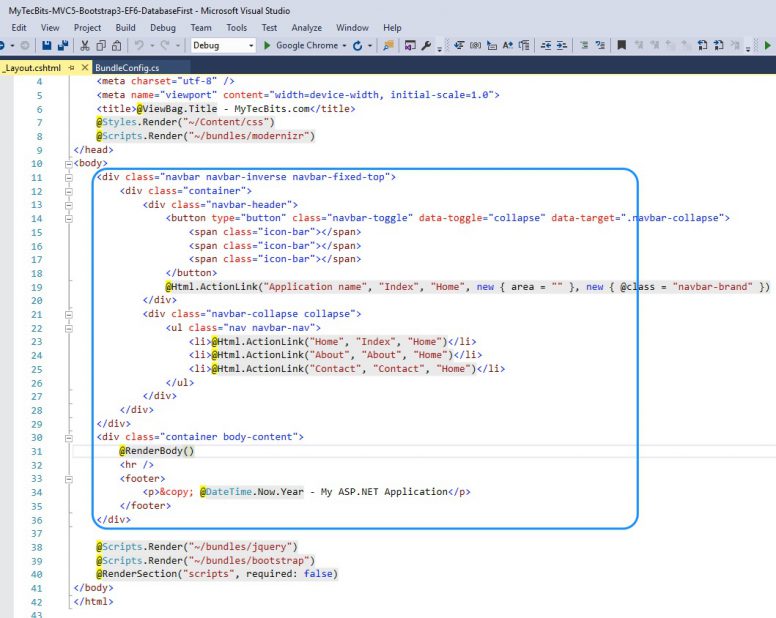
- Instead of the removed section, paste the below code.
<div class=”container”>
<div class=”masthead”>
<h3 class=”text-muted”>Wide World Importers</h3>
<nav>
<ul class=”nav nav-justified”>
<li class=”active”><a href=”#”>Home</a></li>
<li><a href=”#”>Projects</a></li>
<li><a href=”#”>Services</a></li>
<li><a href=”#”>Downloads</a></li>
<li><a href=”#”>About</a></li>
<li><a href=”#”>Contact</a></li>
</ul>
</nav>
</div>@RenderBody()
<!– Site footer –>
<footer class=”footer”>
<p>© 2016 www.MyTecBits.com</p>
</footer>
</div> <!– /container –>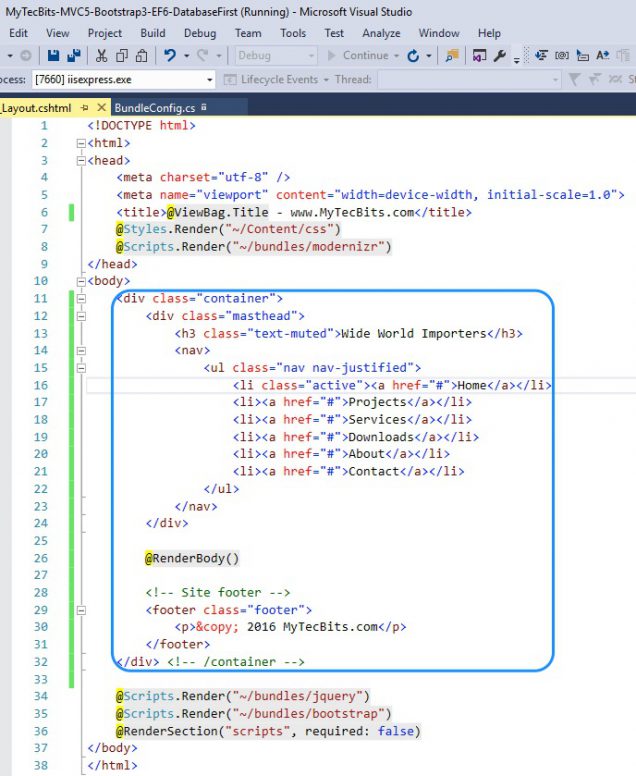
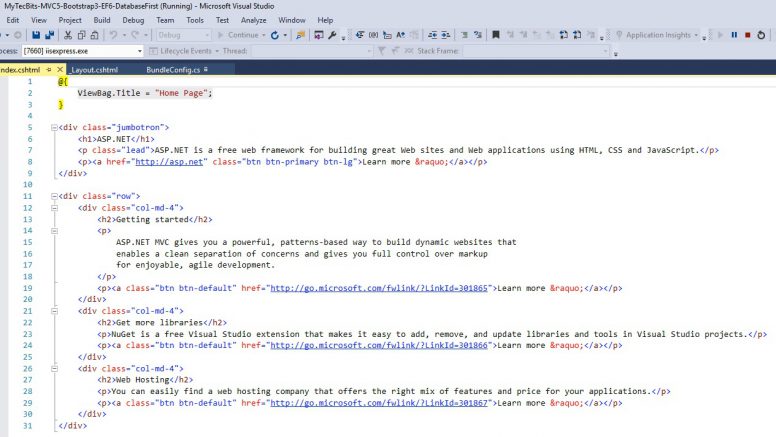
- Open the Index.cshtml file in the Home folder under Views. For this example, I’m not going to change the content of this file now. This existing content will work well the current Bootstrap Justified-Nav template. If you want you can change it using the bootstrap grid system using one or many rows and columns. Read more about bootstrap grid system here.
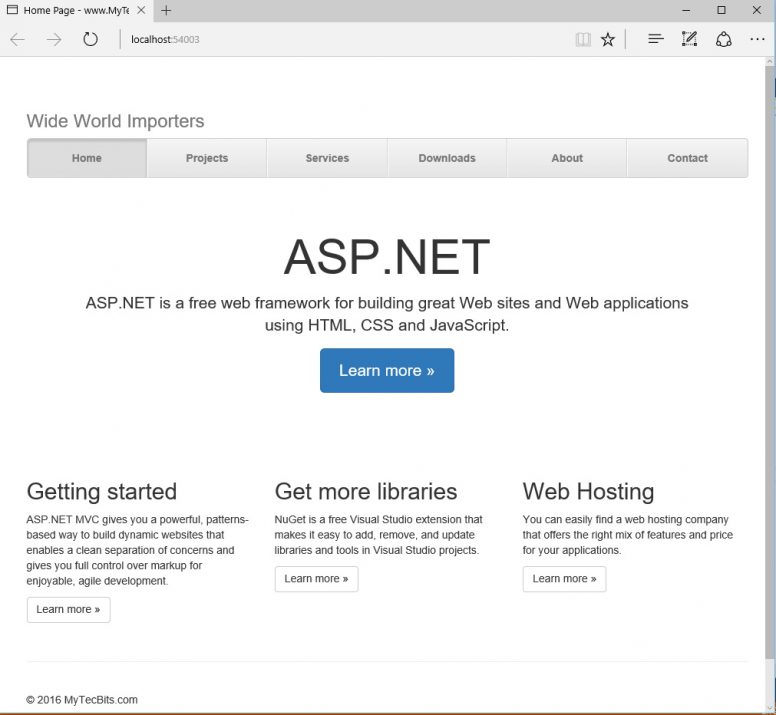
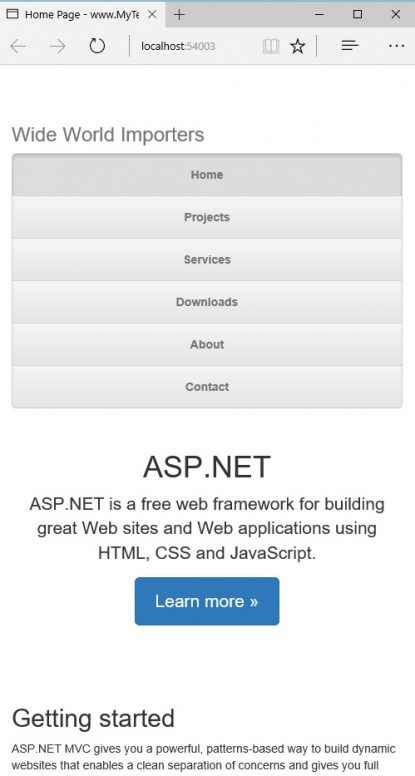
- Now, Build the solution and execute. You will get the new bootstrap 3 Justified-Nav layout in ASP.NET MVC 5. This is a fluid layout which re-align itself based on the size of the display.
V. Creating Models
Now we will use the Entity Framework to create the models from the SQL Server database tables. I’ll be using SQL Server 2016 and it’s sample database WideWorldImporters for this example. You can use any other database if you are comfortable with following this instruction with another table and data. Or, you can install SQL Server 2016 and WideWorldImporters sample database by following the articles Installing SQL Server 2016 and Installing SQL Server Sample Database. Once you have the database and tables in place, proceed to the below steps.
Steps For Creating Entity Data Model Using Database First Workflow
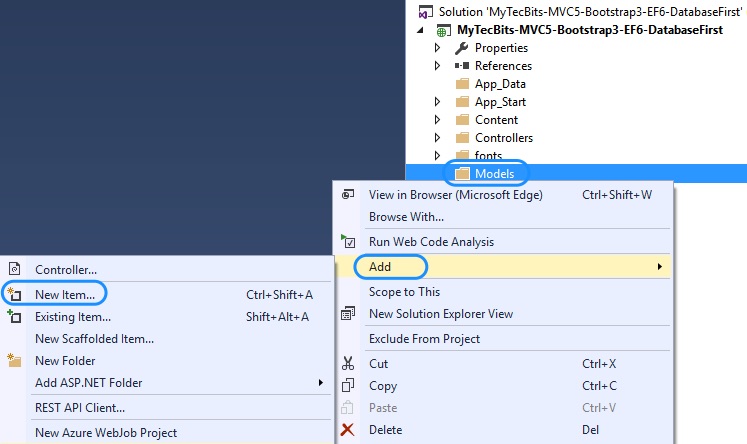
- In the solution explorer, select the Models folder and right-click. In the right-click menu select Add and then New Item...
- In the New Item screen, select Data under Visual C#. Then select ADO.NET Entity Data Model. Change the name to WideWorldImportersModel (I’ve used the model name as WideWorldImportersModel as I’m using the WideWorldImporters database. You can use a different model name, in case if you are using a different database). After entering the name of the model, press Add.

- The Entity Data Model Wizard will pop up. In the wizard, select the option EF Designer from database (Because we are following database first entity framework workflow). Press Next to continue.

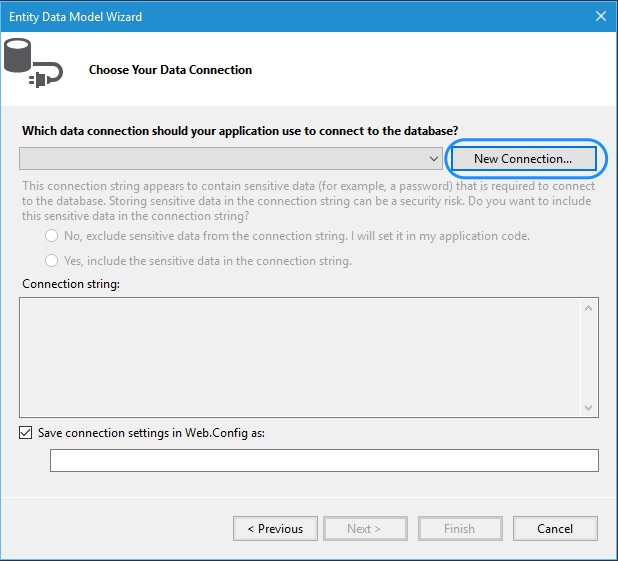
- In the Choose Your Data Connection screen, press New Connection… button to create a connection to the database.
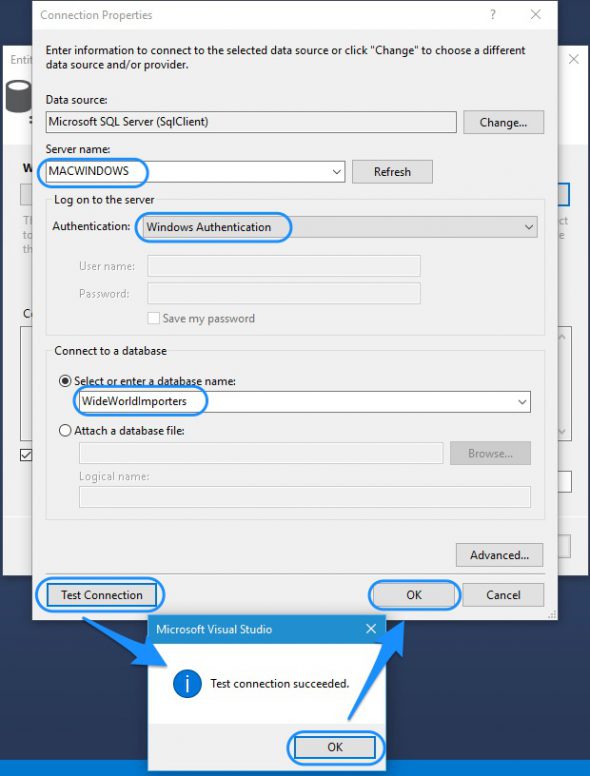
- In the Connection Properties screen, use the drop-down box for the server name to select the server which has your sample database (In my case, it’s my local pc MACWINDOWS). Choose the proper authentication to log on to your SQL Server (In my case, it’s Windows Authentication). Then, select the database, as we are using the Microsoft’s sample database WidwWorldImporters, select it from the drop-down box under Select or enter a database name. Before pressing the OK button, test the connection by pressing the Test Connection button. If the test connection succeeds, then press the OK button. (If you get any error during test connection, check the database connection details you have entered).
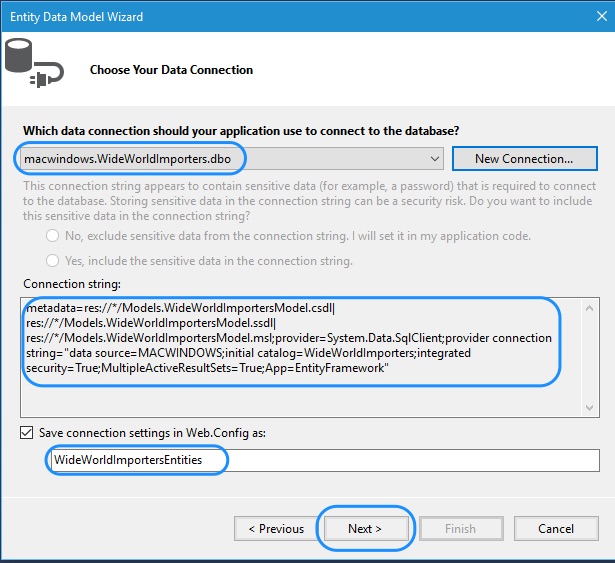
- Now, the new connection is created and displayed in the Choose Your Data Connection screen. Press Next button to continue.
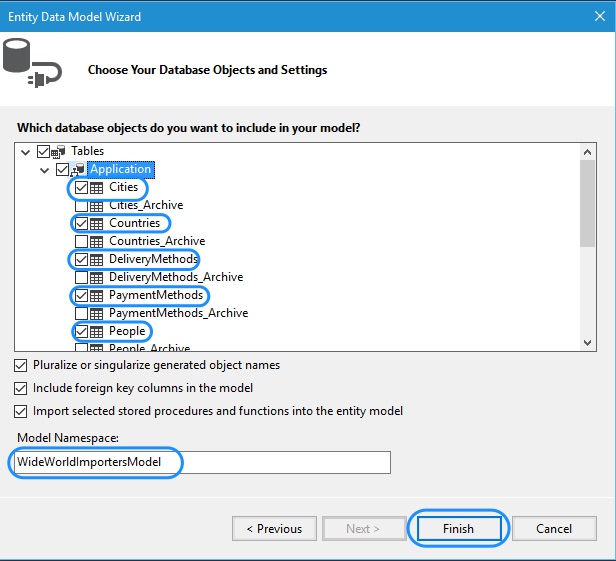
- In the Choose Your Database Objects and Settings screen, expand the schema Application under Tables. Select the tables which are NOT ending with _Archive. Finally press Finish button.
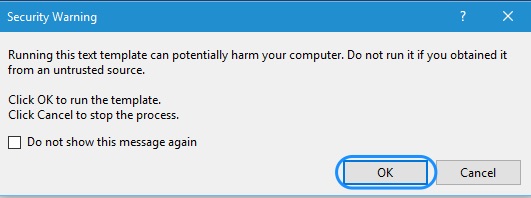
- The system will take few seconds to a minute or so to generate the model. In-between if you get any security warning message, press OK to continue.
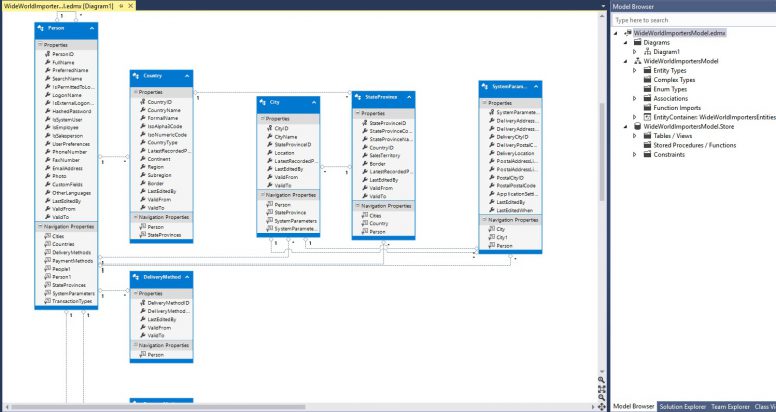
- Once the Entity Framework Model is generated, Visual Studio will display a table relationship diagram with the tables you have selected to generate the model.
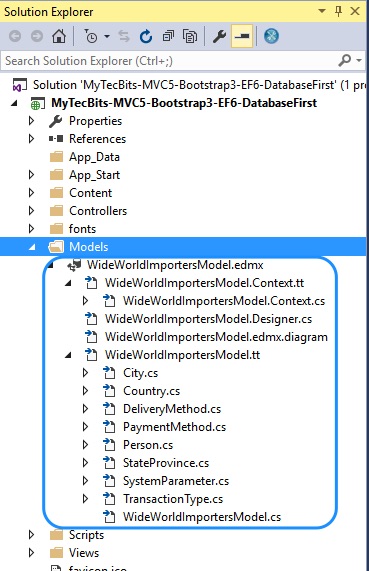
- Close the model diagram and see the Models folder in Solution Explorer. You can see several new files generated by the Entity Data Model Wizard.
- Now build the project or solution. This is important. If you go ahead further without building the project, you will get errors while using this model.
VI. Creating Views And Controllers
In this section we will create the views and controllers for the model using scaffolding method.
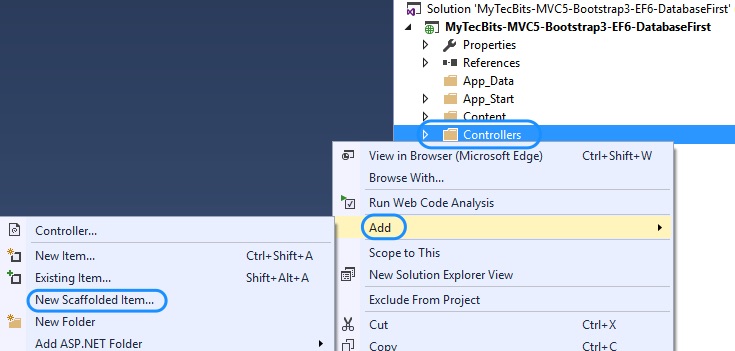
- In the Solution Explorer, Select the Controllers folder and right-click. In the right-click menu, select Add and then New Scaffolded Item…
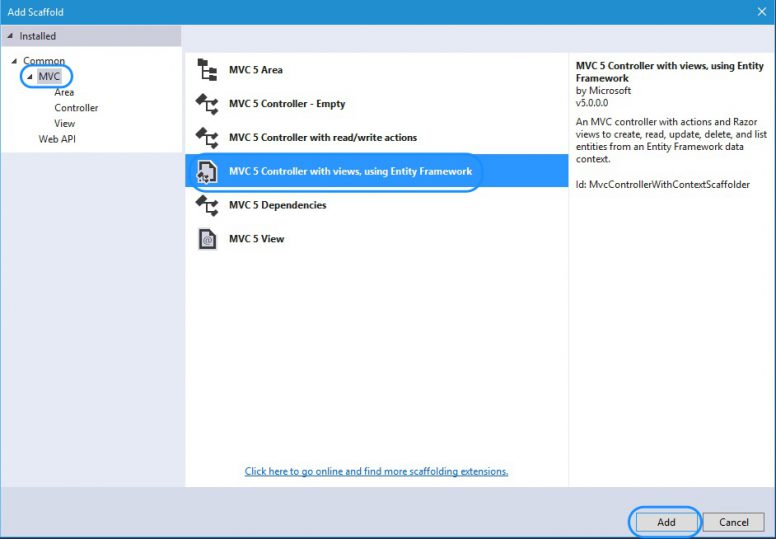
- In the Add Scaffold screen, select MVC in the left panel and MVC 5 Controller with views, using Entity Framework from the center panel. Press Add button.
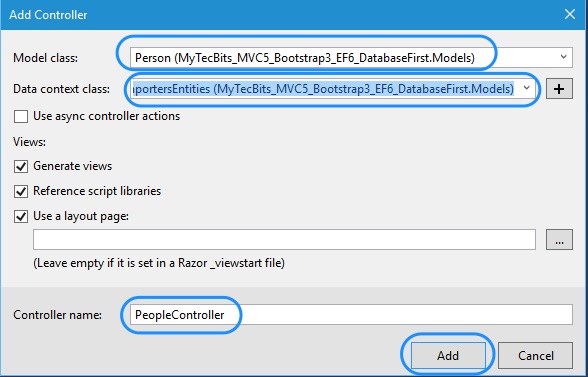
- In the Add Controller screen, select the model class Person from the drop-down list. Then select the context class WideWorldImportersEntities. Press Add to generate the controller and the corresponding views.
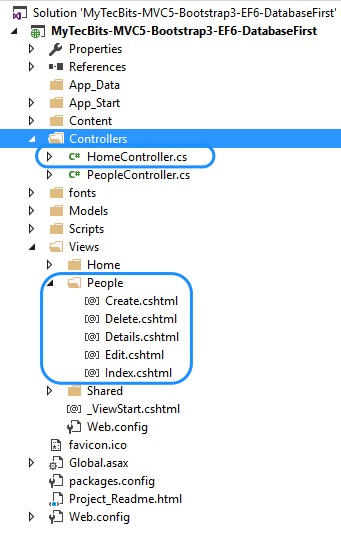
- In the Solution Explorer, you can see the controller PeopleController.cs and the views Create, Delete, Details, Edit and Index under the People folder in Views.
VII. Checking The Newly Generated Views
Let’s check the new People views generated by scaffolding. To navigate to the views, we’ll change a menu item in the layout file.
- Open the _Layout.cshtml file under Views >> Shared folder.
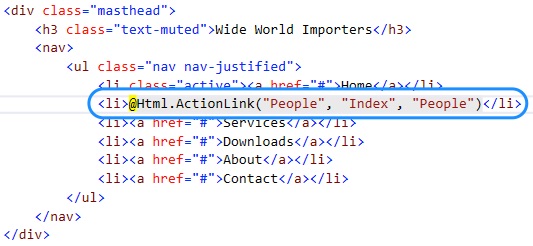
- In the navigation menu, change the code <li><a href=”#”>Projects</a></li> to:
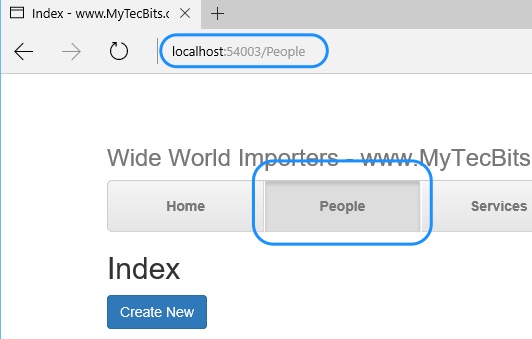
<li>@Html.ActionLink(“People”, “Index”, “People”)</li>
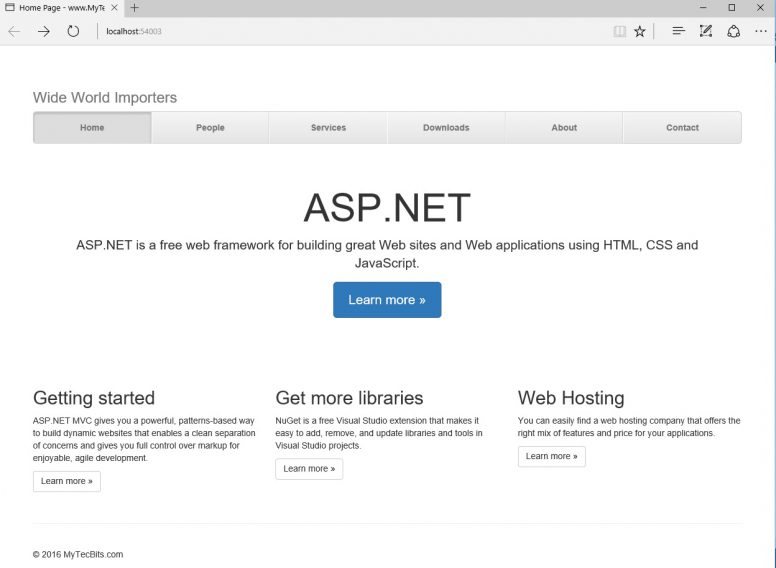
- Now, build the project and view in browser. The home page will be like this:
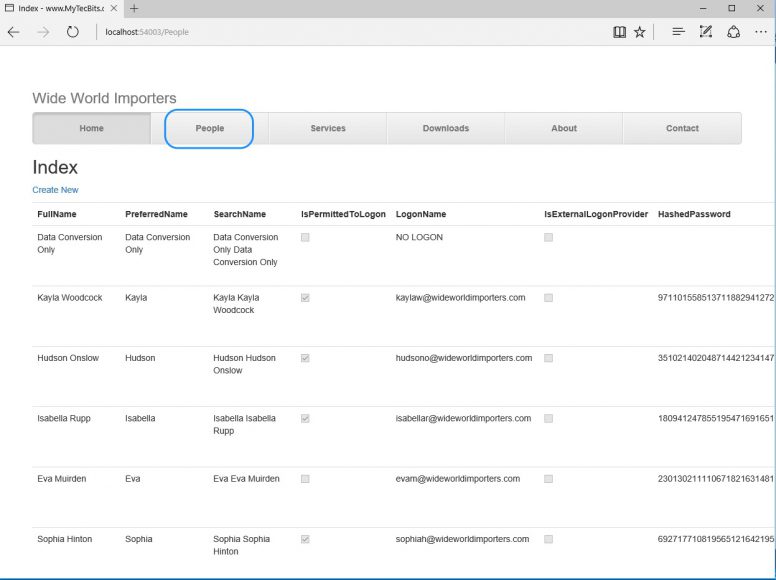
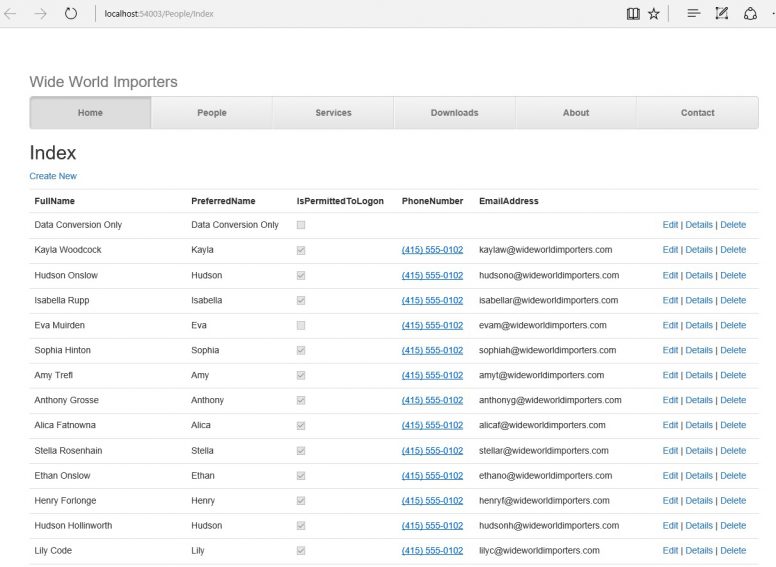
- Press the People menu to launch the index view of People. You will notice all the records from the people table will be listed making you to scroll to the right to see the Edit, Details and Delete Links. We will customize this views and give a better look and feel using bootstrap styles.
VIII. Customizing Views Using Bootstrap Classes
The MVC project is now ready to apply the bootstrap classes and customize further. In this section, I’ll show you how to change the style of some of the ASP.NET MVC controls and some of the basic html controls using bootstrap.
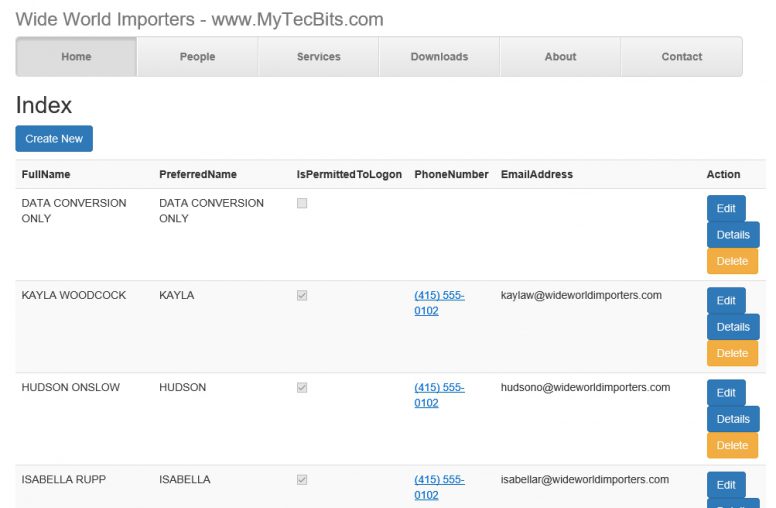
Remove Unwanted Data Fields From Index View
- Open the Index.cshtml view file under Views >> People.
- In this file, leave the fields FullName, PreferredName, IsPermittedToLogon, PhoneNumber, EmailAddress and the Edit, Details, Delete action links and remove the other fields from the table’s head and body. The resultant code in the file will be like this.
@model IEnumerable<MyTecBits_MVC5_Bootstrap3_EF6_DatabaseFirst.Models.Person>
@{
ViewBag.Title = “Index”;
}<h2>Index</h2>
<p>@Html.ActionLink(“Create New”, “Create”)</p><table class=”table”>
<tr>
<th>
@Html.DisplayNameFor(model => model.FullName)
</th>
<th>
@Html.DisplayNameFor(model => model.PreferredName)
</th>
<th>
@Html.DisplayNameFor(model => model.IsPermittedToLogon)
</th>
<th>
@Html.DisplayNameFor(model => model.PhoneNumber)
</th>
<th>
@Html.DisplayNameFor(model => model.EmailAddress)
</th>
<th>Action</th>
</tr>@foreach (var item in Model)
{
<tr>
<td>
@Html.DisplayFor(modelItem => item.FullName)
</td>
<td>
@Html.DisplayFor(modelItem => item.PreferredName)
</td>
<td>
@Html.DisplayFor(modelItem => item.IsPermittedToLogon)
</td>
<td>
@Html.DisplayFor(modelItem => item.PhoneNumber)
</td>
<td>
@Html.DisplayFor(modelItem => item.EmailAddress)
</td>
<td>
@Html.ActionLink(“Edit”, “Edit”, new { id = item.PersonID }) |
@Html.ActionLink(“Details”, “Details”, new { id = item.PersonID }) |
@Html.ActionLink(“Delete”, “Delete”, new { id = item.PersonID })
</td>
</tr>
}
</table>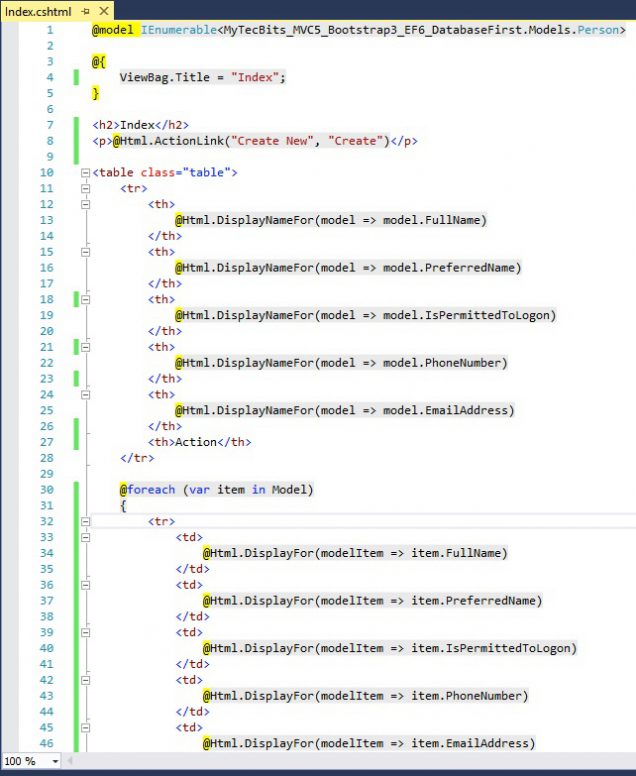
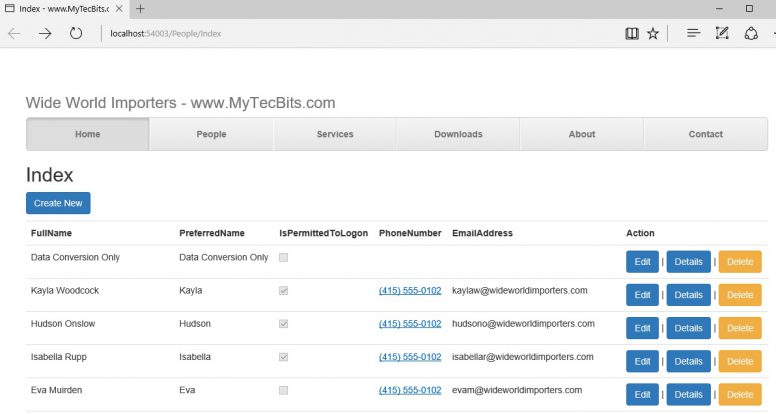
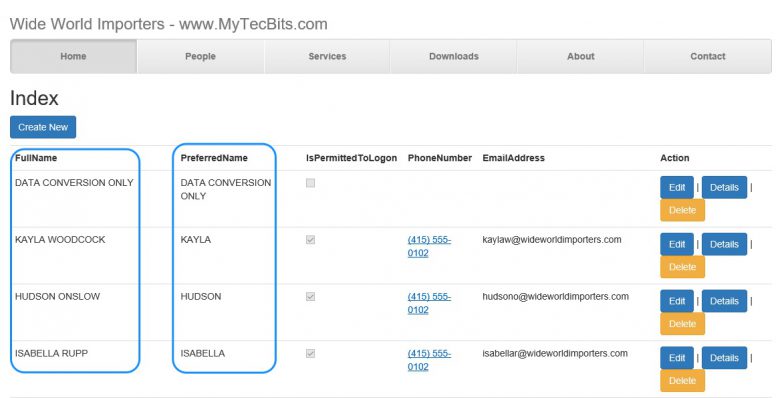
- On loading in the browser, the people index view looks like this.
Styling Html.ActionLink As Bootstrap Buttons
Now, you’ll see how to style the action link html helper to display it like a button. The bootstrap class for button is btn followed by the options btn-default, btn-primary, btn-syccess, btn-info, btn-warning, btn-danger and btn-link. To apply bootstrap button class in html action link helper class, you have to use the htmlAttributes object parameter.
- In the Index.cshtml, In Create New action link, add null for RouteValues parameter new { @class = “btn btn-default” } for htmlAttribute.

- Do the same for the other action links Edit, Details and Delete. For delete action you can set the bootstrap button option as btn-warning, so as to highlight the button to the users to be careful on using the button.

- Now, load the project in browser and check the people index view. See the beautiful Create New, Edit, Details and Delete buttons.
Styling Html.DisplayFor Text With Bootstrap CSS Class
Html.DisplayFor does not comes with the HtmlAttribute parameter to add the CSS class. So, you have to do some workaround to style the data displayed by Html.DisplayFor helper. There are two ways:
- Wrap the DisplayFor with a div, paragraph or span tag and apply the CSS class in the wrapper tag, like <div class=”text-uppercase”>@Html.DisplayFor(modelItem => item.FullName)</div> to display the text in upper case.

- Another option is to create custom display template. Follow these steps to create a custom template with bootstrap CSS classes and apply the template to Html.DisplayFor.
- Create a folder DisplayTemplates under Views\Shared\.
- Create an empty view called class.cshtml without layout under DisplayTemplates folder.
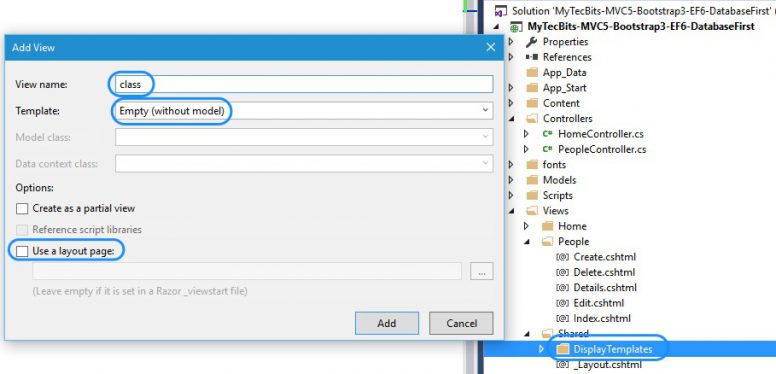
- Remove all the code in the class.cshtml and add the below code.
<span @(ViewData[“class”] != null ? “class=” + ViewData[“class”] + “” : string.Empty)>
@ViewData.TemplateInfo.FormattedModelValue
</span>
- Now, go back to the people index view and add a ViewData with name as class. Assign a bootstrap class say text-uppercase as value to ViewData[“class”]. Then add “class” to the Html.DisplayFor as second parameter.
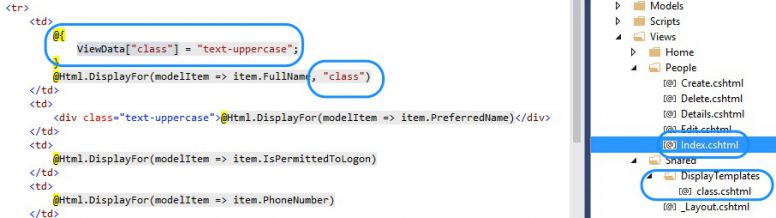
Now load the project in browser and check the FullName and the PreferredName fields. For PreferredName field, I have used the wrapper method to apply the bootstrap class. For FullName field, I have used DisplayTemplate method. Both options displays similar result. It’s up to you to decide which method is good for your application. In this example I’ve used Bootstrap’s text-uppercase styling. You can use any type of bootstrap class using these methods.
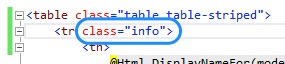
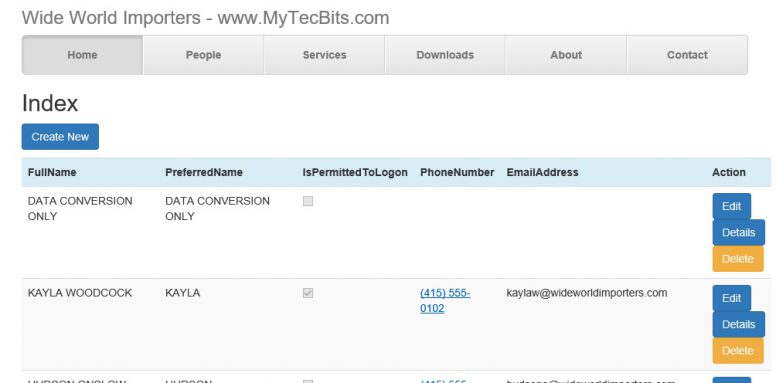
Styling Table With Bootstrap CSS Class
Styling of html table is very easy using bootstrap. I’ll apply few bootstrap classes to style the table in People’s Index view. As the table is created just by plain html, styling it is straight forward. To apply table classes, first add the class table to the <table> tag, then append the options like table-striped, table-bordered, table-hover, etc.
For example, I’ll add the table-striped option to display alternate row in different background color which appears like stripe.
![]()
I’ll also add a bluish background color for the header row. To do this I’ve to add the info class to the table’s header <tr>.
Making Bootstrap Menu Active Or In-Active
If you noticed the bootstrap menu, the Home menu is always active even when we are in People’s views.In bootstrap you can make a menu item active by adding the active class to the list item, i.e. <li class=”active”><a href=”#”>Services</a></li>.
To make the menu item active dynamically based on the current MVC controller loaded, you have to add a line of razor code for each of the menu items. Just add class=”@(ViewContext.RouteData.Values[“Controller”].ToString() == “People” ? “active” : “”)” to the list item <li> tag of the People Menu. Do this to the other menu items by changing the controller name in the razor code.

Now, load the project in browser and check the menu. You can see the menu items are active or inactive based on the loaded controller.
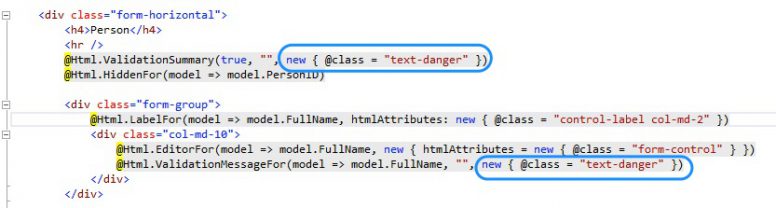
Styling Html.ValidationSummary and Html.ValidationMessageFor With Bootstrap Classes
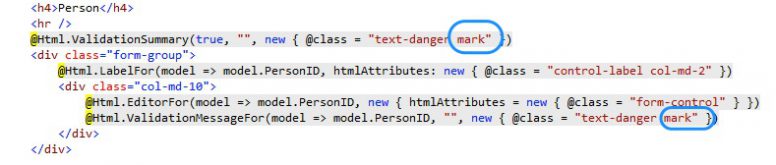
The html helper controlls Html.ValidationSummary and Html.ValidationMessageFor has htmlAttributes object parameter. You can add the bootstrap classes in the htmlAttributes parameter to style the validation summary text. To try that, Open the Edit.cshtml view file under Views/People/. You will see the two controls I’ve just mentioned are there and they are already using the htmlAttributes to apply the bootstrap class text-danger.
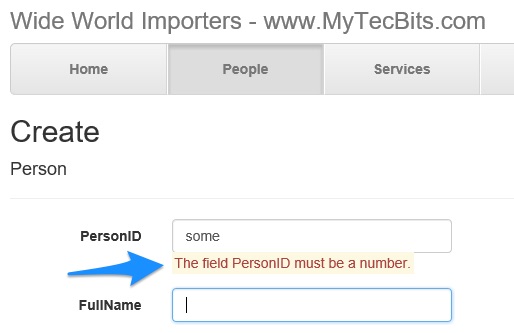
You can add another bootstrap class (let’s say mark to highlight the text) to these htmlAttributes.
Load the create view in browser by pressing the Create New button in People’s Index view. In the persionID field enter some Non-Numeric characters and tab out. You will see the error message below the text box highlighted in yellow
Styling Html.LabelFor With Bootstrap Classes
Html.LabelFor also has a parameter for htmlAttributes. You can use it to add the bootstrap class to the label text. This is similar to how you’ve added bootstrap class to Html.ValidationSummary and Html.ValidationMessageFor.
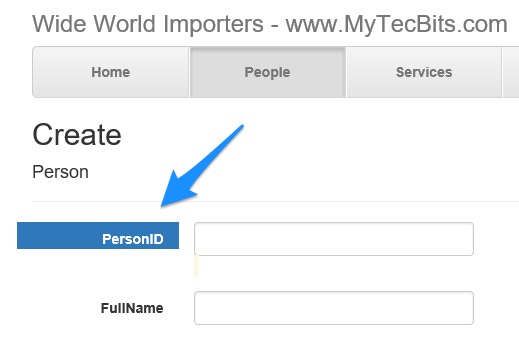
For example, If you want to add primary background color for the PersonID label, Then you’ve to add the bootstrap helper class bg-primary to the htmlAttributes parameter like @Html.LabelFor(model => model.PersonID, htmlAttributes: new { @class = “bg-primary” }).
![]()
Styling Html.EditorFor With Bootstrap Classes
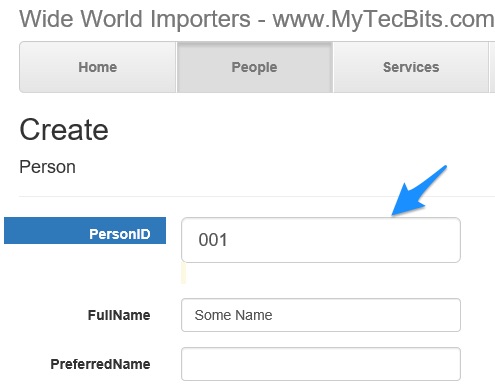
Adding bootstrap classes to Html.EditorFor is little different from what we have seen so far. Html.EditorFor has a provision to induce the htmlAttributes through the additionalViewData parameter. You can add the htmlAttribute like new { htmlAttributes = new { @class = “form-control” } } in additionalViewData parameter.
For example, if you want to make a form control text box larger than the default size, then you have to add the bootstrap class input-lg like this: new { htmlAttributes = new { @class = “form-control input-lg” } } in additionalViewData parameter.
![]()
With this, I’m completing this article. Please, Note that the scope of the article is to demonstrate the usage of bootstrap styling in ASP.NET MVC 5 with EF 6 and it’s helper classes and controls. So, with the current code, you may get errors while saving the Edit and Create New forms. Later, when time permits, I’ll try to fix these issues.
You can download the source code from my GitGub Repositary @ MyTecBits-MVC5-Bootstrap3-EF6-DatabaseFirst.
Related Articles
- Bootstrap 3 with ASP.NET MVC 5 – Step by Step.
- Knockout.js and Bootstrap with ASP.NET MVC: Step by Step.
- Bootstrap 3 with ASP.NET Web Forms – Step by Step – Without NuGet Package.
Reference
- Bootstrap @ https://getbootstrap.com/.
Thanks your sharing, It really help me a lot to understand what is Bootstrap ……..
curious why no authentication since it is an “admin”?
Hi dbinott,
As this is a demonstration of using Bootstrap in MVC and EF, I ignored the authentication.
Thanks for this article! two thumbs up!
I considered my skills a UI design very poor and using Bootstrap was beyond me. This article has given me the much needed start to explore this area. Thank you very much!!
Hi Sudhir,
I’m glad that this article has helped to to explore bootstrap with MVC. Thank You.
Excellent!! Thanks for sharing
Excellente!
Great article, thanks!