

In part-1 of the SQL Server Management Studio tutorial, I’ve explained about SSMS, connecting SQL Server with SQL Server Management Studio and about Object Explorer. Here in part-2, I’ll walk you through the below details in SSMS:
Contents of SQL Server Management Studio Tutorial Part-2
- SQL Query editor window.
- Changing windows layout.
- Some editing tools.
- Registered servers.
- About templates, solutions and scripting projects.
Video Walk Through On SQL Server Management Studio – Part-2
SQL Query Editor Window
Query editor window is for writing, editing, executing and debugging SQL queries like select query, insert query, update query, stored procedures, views, indexes, etc..
New Query Window
- To open the query editor window press the New Query icon from the tool bar. A new query editor window will open in the document windows panel.

- The query editor window connects to the database which was selected in the object explorer. Here, the editor window is connected to the database MtbDbTwo. This is because the database is already in selected state in the object explorer.
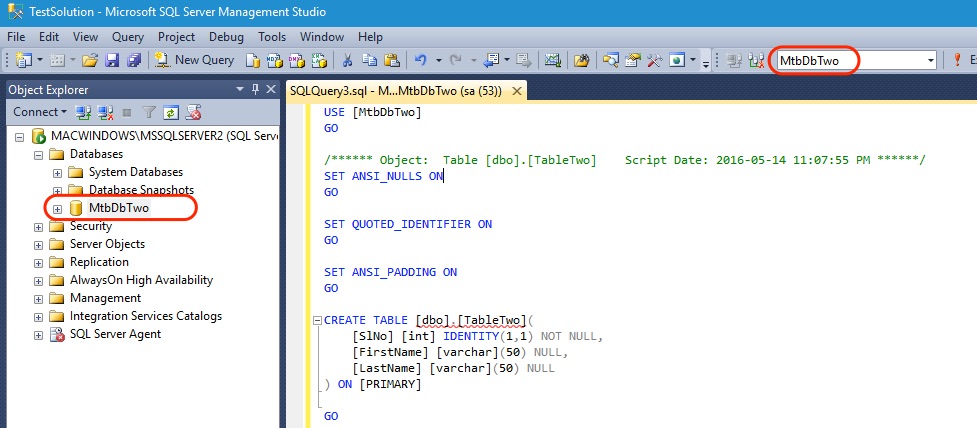
- If you want to change the database, then go to the database selection field in the tool bar and select another database.
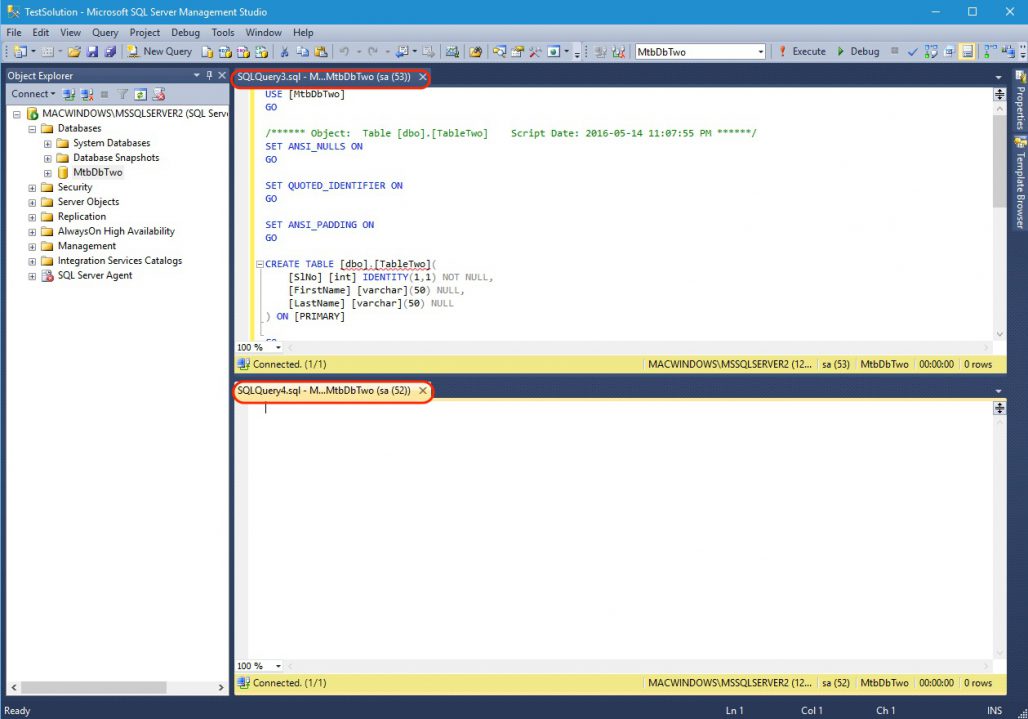
Multiple Query Windows
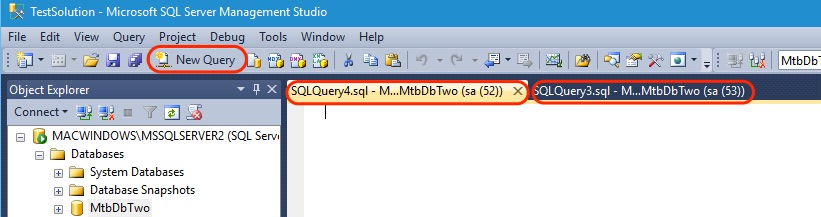
- You can open multiple query editor windows at the same time. Just press the New Query icon in the tool bar again to open another editor window.
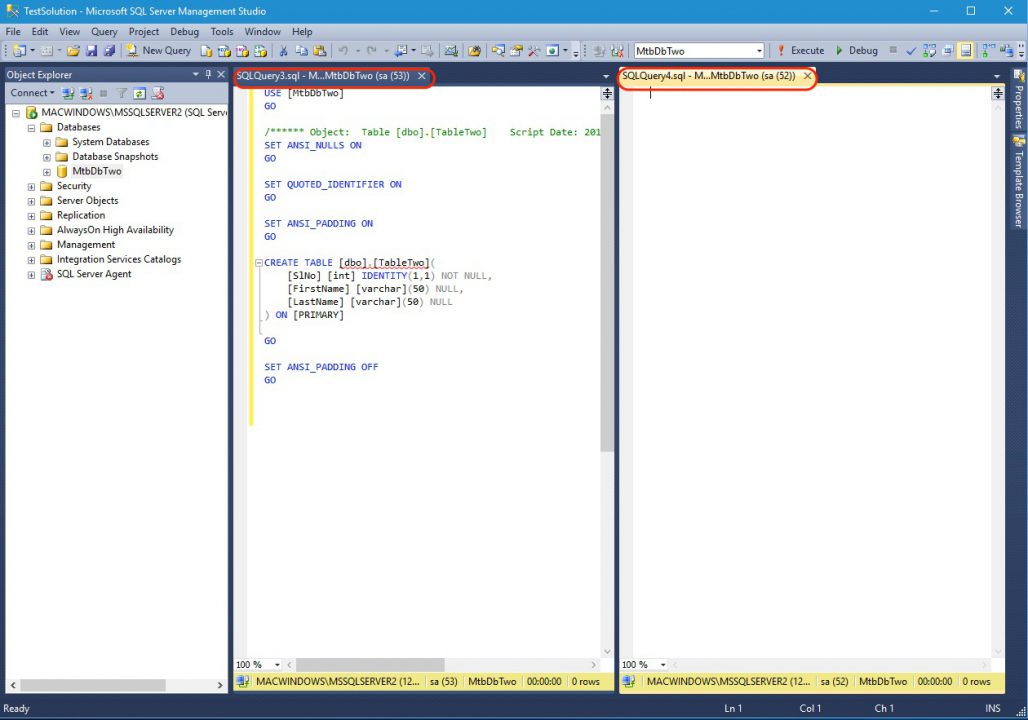
New Horizontal Tab Group & New Vertical Tab Group
- To see two query editor windows at the same time, use the Horizontal Tab Group or the Vertical Tab Group option.
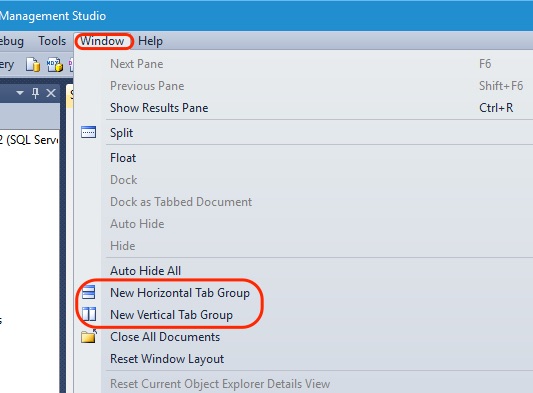
- For creating a horizontal tab group, go to the Windows menu and select New Horizontal Tab Group option. Now the two query windows are visible one below the other.
- For creating a vertical tab group, go to the Windows menu and select New Vertical Tab Group option. Now the editor windows are visible side by side.
Docking And Undocking Query Editor Window
- For undocking editor window from the documents panel, go to the title tab of the editor window and double-click on it. The double-click action undocks the editor window.
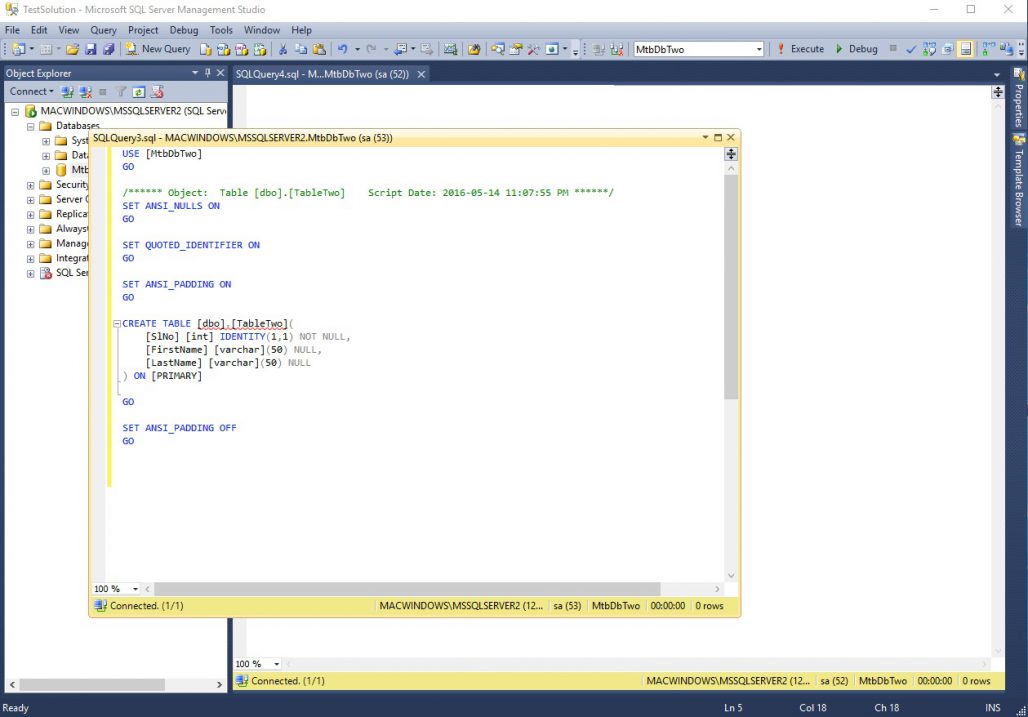
- You can make the undocked editor window full screen by double clicking the title bar again.
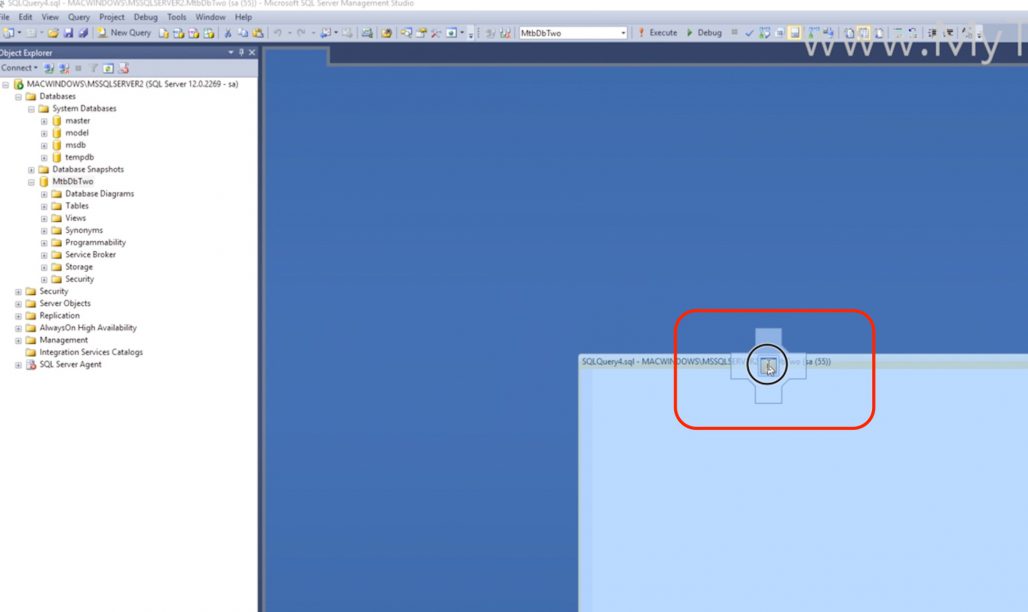
- To dock the editor window back to its original position, hold the title bar and drag it to the center of the screen, A docking icon appears at the center of the screen. Drag the mouse to the dock icon and leave it. The editor window will be docked to the documents panel.
Executing Query
- For executing a query, write a query in the query editor window. For example, you can write a select query to fetch the records from a table.
- Then press the Execute icon in the task bar.
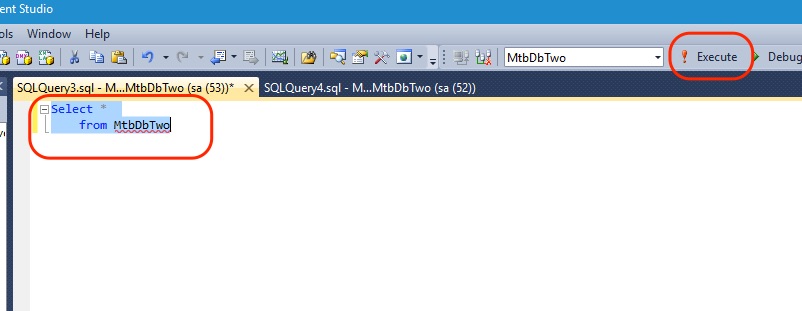
- The queries in the query editor window will be executed and the results are displayed in the result window below the query editor.
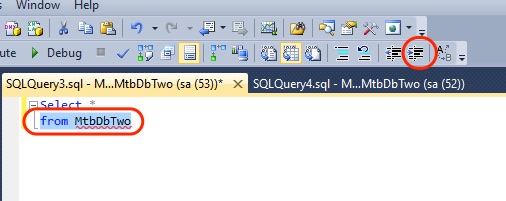
Adding Indentation
- For indenting the lines in the query, select the lines of the query to be intended and press the Increase Indent icon in the tool bar.
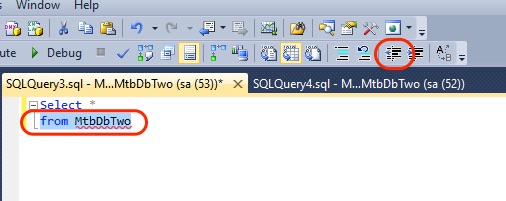
- To remove or decrease the indent, select the line again and press Decrease Indent icon. The decrease indent icon will be next to the increase indent icon.
Using Comments
- For commenting a line in the query, select the line and press the Comment icon in toolbar.
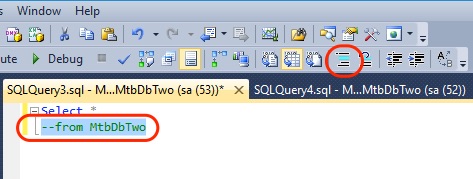
- For removing the comment, select the commented line and press the Uncomment icon.

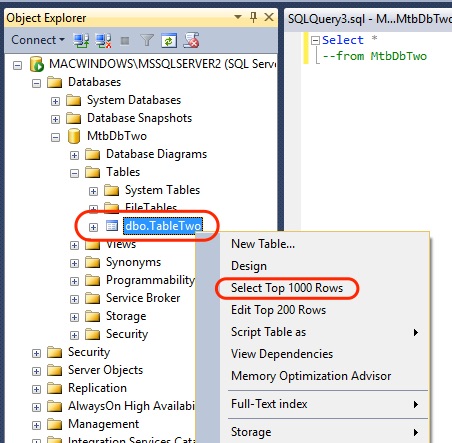
View Records In Table Without Writing Query
- To see the records in the table without writing a select query, right-click the table name in the object explorer and choose Select Top 1000 Rows. This option will open a new query editor window and generate a SQL select query to fetch the top 1000 records and the result of the query in the result window below.
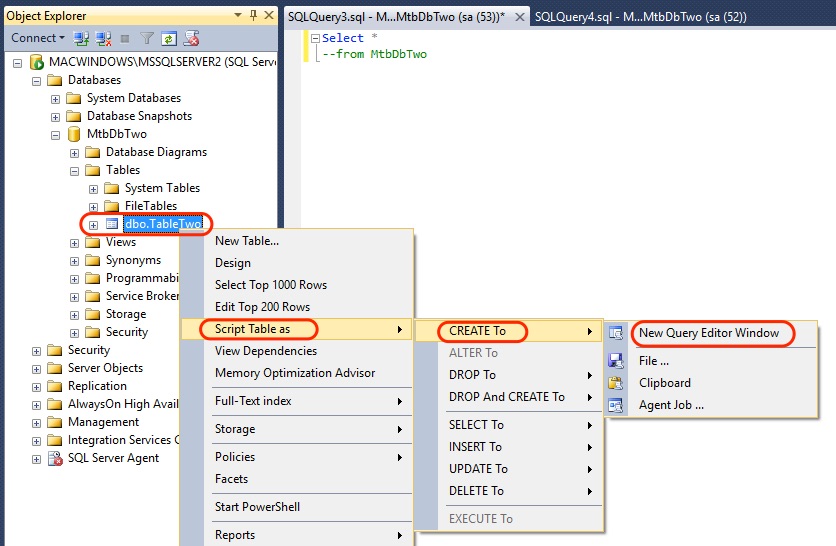
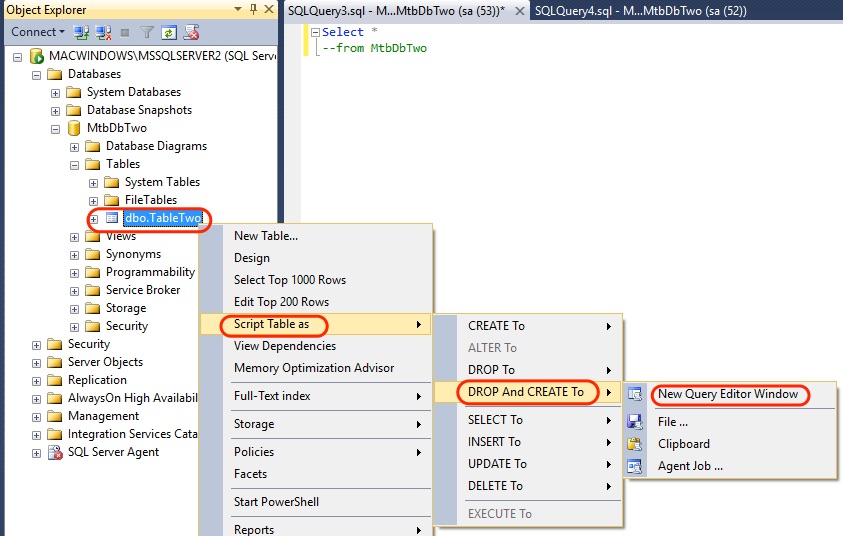
Scripting Tables
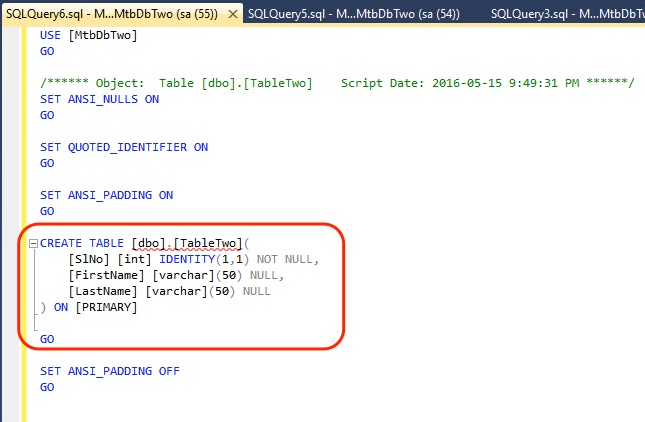
- To generate a table creation script from an existing table, go to the object explorer, expand the database, find the table, select it and right-click. From the right-click menu, select Script Table as option and then CREATE To and New Query Editor Window. This will generate a table creation script in a query editor window.
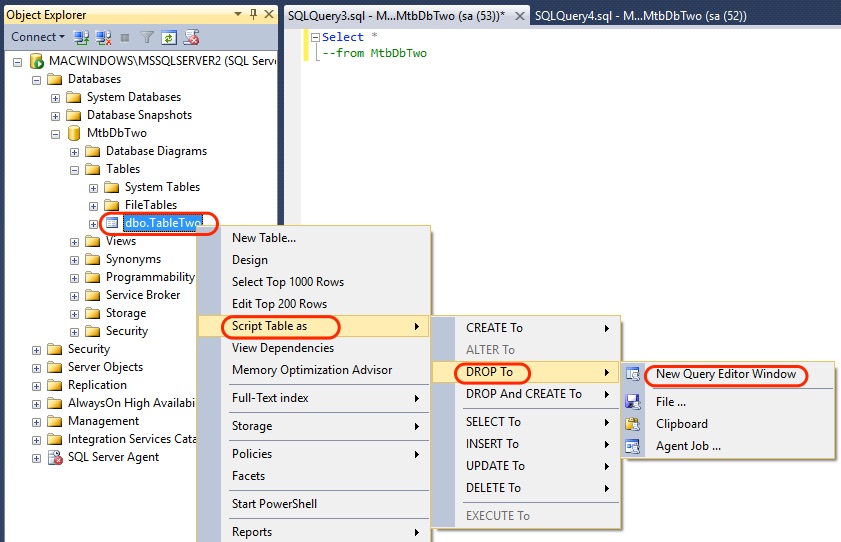
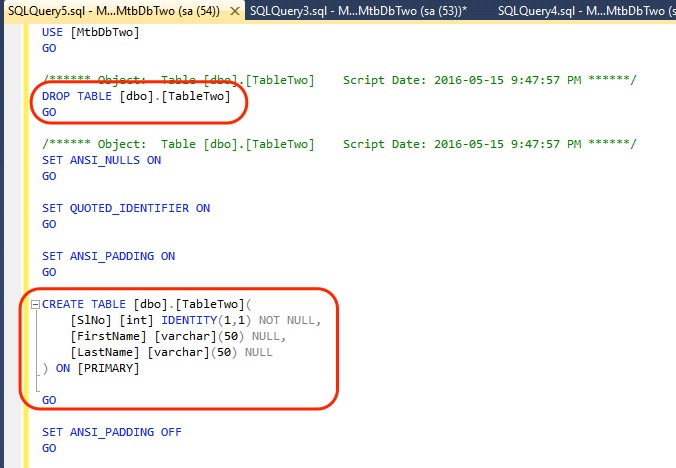
- To generate a drop table script; From the right-click menu select Script Table as option and then DROP To and New Query Editor Window. This will generate a drop table script in a query editor window.
- Similarly here is another option to generate a script with both DROP and CREATE table query. For that, you have to use the DROP And CREATE To Option.
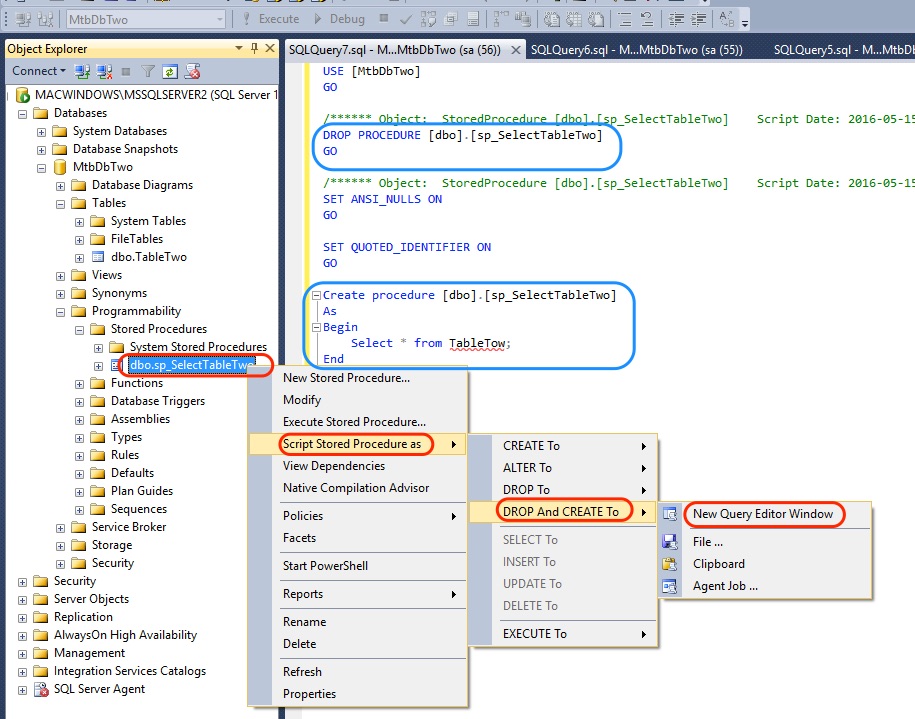
Scripting Other Database Objects
- Just like scripting a table, you can also script stored procedure, view, etc. You can generate create script , alter scripts, drop script, etc. for Stored procedure, view and other objects.
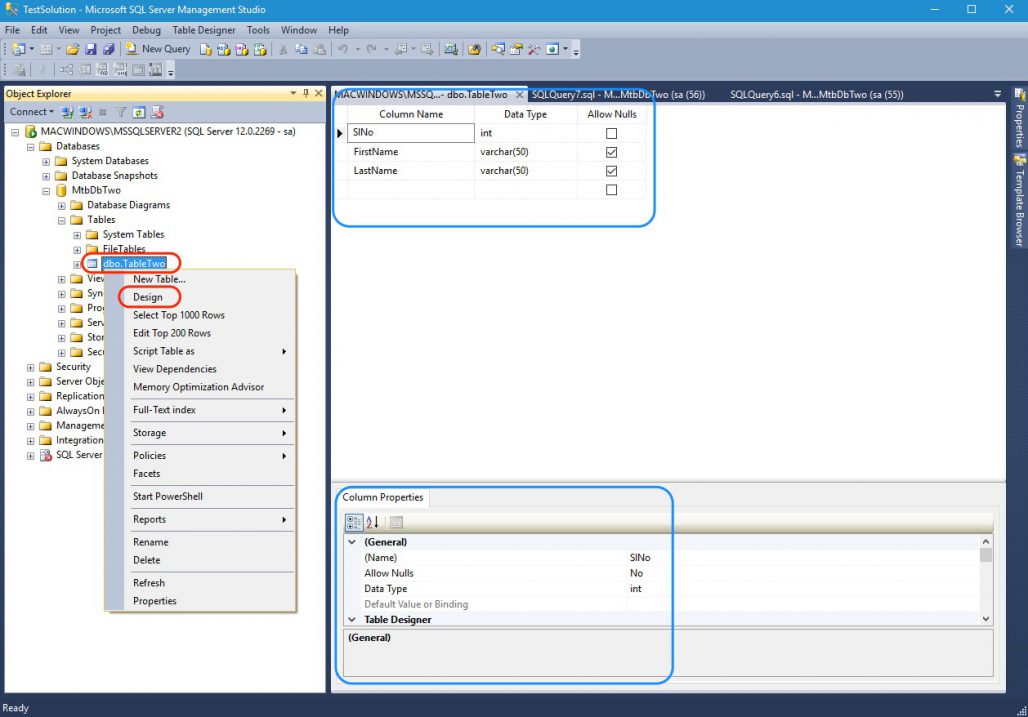
Design View Window
The design view window helps you to see the table design like the column details and edit them or add new columns, keys, etc..
Table In Design View
- To see the table in design view, go to Object Explorer, select the table name, right-click and select Design.
- The design view window will open in the documents panel.
- In the design view, you can alter the column properties, keys and other details. You can even add columns to the table.
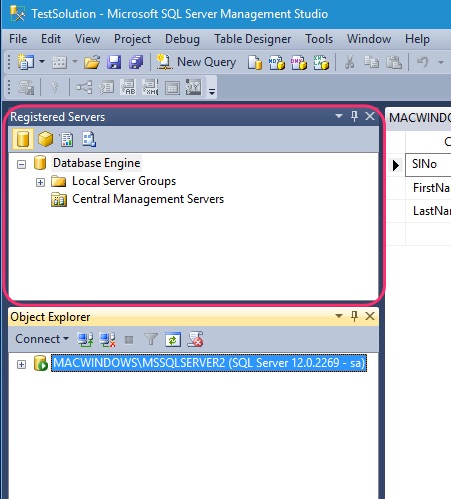
Registered Servers
Another important window in SQL Server Management Studio is the Registered Servers Window. This window helps to register SQL Server details and credentials. There are several advantages in registering a server.
Advantages Of Registered Servers
- Registering the SQL Servers will store the connection information in SSMS.
- It helps to find if a registered server is running.
- You can easily connect Object Explorer and Query Editor to a registered server.
- You can create multiple groups of servers.
- Provide user-friendly names for registered servers.
- You can Export & Import registered server groups to another SSMS client.
Registering A SQL Server
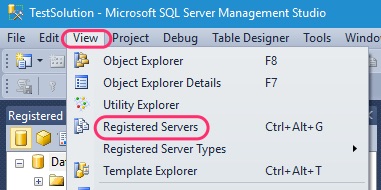
- To launch the registered servers window, go to View menu and select Registered Servers.
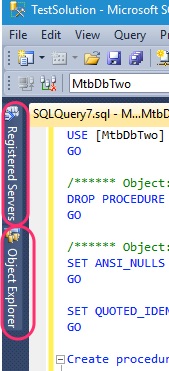
- The window will open in the left panel above the object explorer.
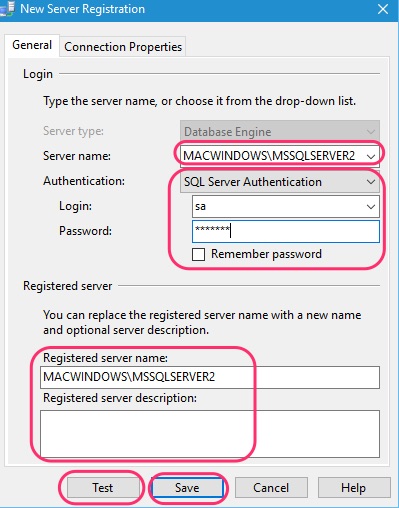
- To register a SQL Server, Right click Local Server Groups folder and select New Server Registration.

- In the New Server Registration window, enter the server name and instance name and enter the login credentials and press Save button to register. Before saving , you can test the connection details by pressing the Test button.
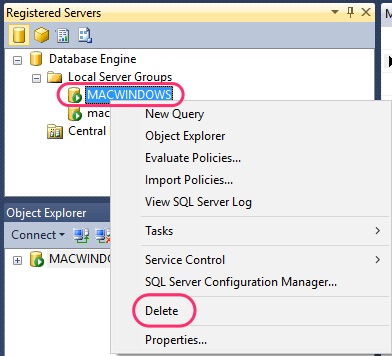
- To remove the server from the registered servers list, right-click the server and choose Delete.
Changing Windows Layout
In SQL Server Management Studio, you can change the layout of the windows for your convenience, by closing a window or setting the window to auto hide or by re-sizing the window.
- To open the closed window, go to View menu and select the window you want to open.
- To make the window auto hide, just press the Pin icon at the top right corner just before the close icon.
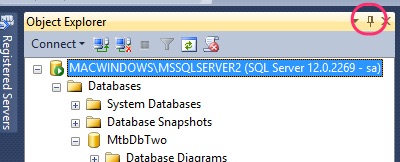
- To view the auto hide window just move the cursor over the tab with the window name.
- To undock a window, just drag the title bar of the window.
- To dock again, drag the window (by holding the title bar) to the center of the screen, the docking option box will appear. You can choose the docking position from the docking box.
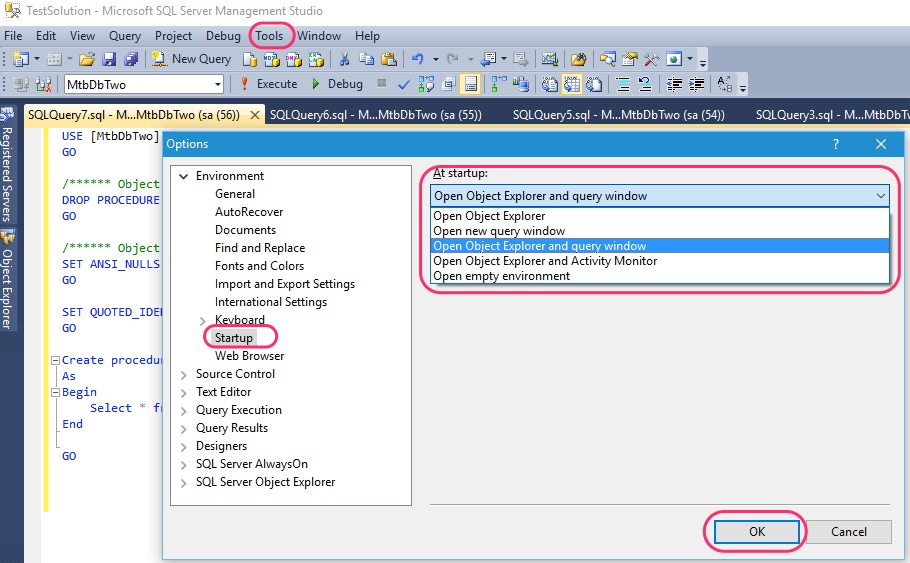
Setting Startup Options
You can choose which window to open during start-up.
- To set this startup option go to Tools menu >> Options >> Environment >> Startup.
- From the startup field you can choose whether to open Object Explorer alone or Query Window alone or together or even empty.
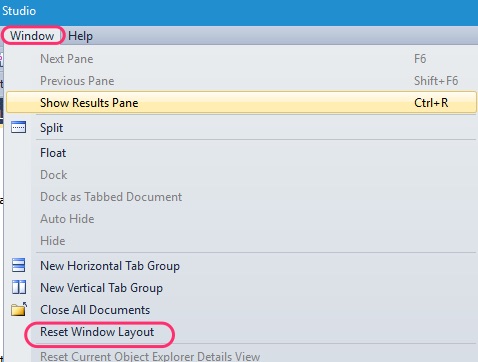
Restoring The Default SQL Server Management Studio Layout
- To restore windows to their original locations, go to the Window menu, and select Reset Window Layout.
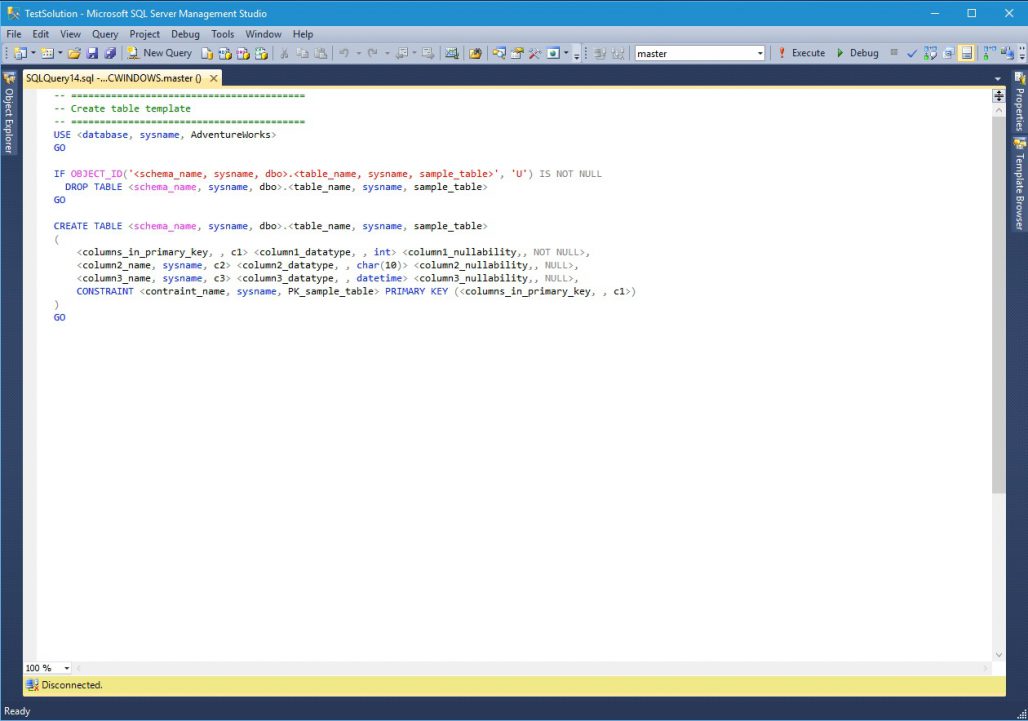
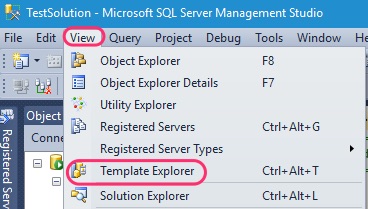
Templates
Templates are the files containing SQL Scripts. These template scripts can help you to create objects in a database. Using templates you can create objects like database, tables, stored procedures, views, indexes, triggers, logins, users, functions, etc.. All the templates are listed in the Template Explorer window.
- To open the template explorer, go to View menu and select Template Explorer.
- The Template Explorer window will open at the right side of the documents window.
- From the template explorer window you can choose the template of the SQL Script you want by double clicking the template. The template will open in a new query editor window.

- You can replace the template parameters with your value and use the template for creating your scripts.
Projects And Solutions
To save the query file to a project, you have to create a project under the solution. For this purpose you have to use the solution explorer.
- To open a solution explorer go to View menu and select Solution Explorer.
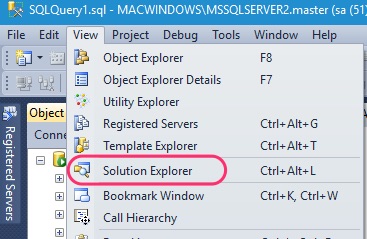
- The Solution Explorer window will open at the right side of the documents panel.

- In the Solution Explorer, you can see the auto generated solution called Solution 1. The current query editor window is represented as a file under the Miscellaneous Files folder. The name of the file is auto generated. There is no project created in the solution yet.
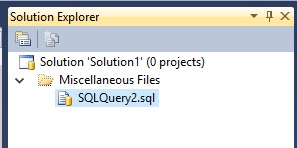
- Before creating a project in the solution, save the current query file.
- To save the file, press the Save icon at the tool bar. A file dialog will open and allow you to save the file.
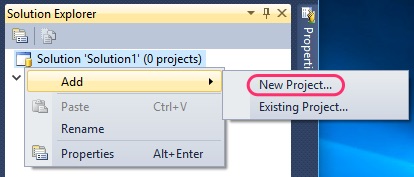
- After saving the file, create a project.
- Creating Project / Solution:
- To create a project, right-click the solution in the solution explorer. In the right-click menu, select Add and then New Project….
- In the Add New Project window, select SQL Server Scripts project type, and enter the name of the project. I’m naming it as “TestScripts”. If needed you can change the location as well. Finally press Ok.
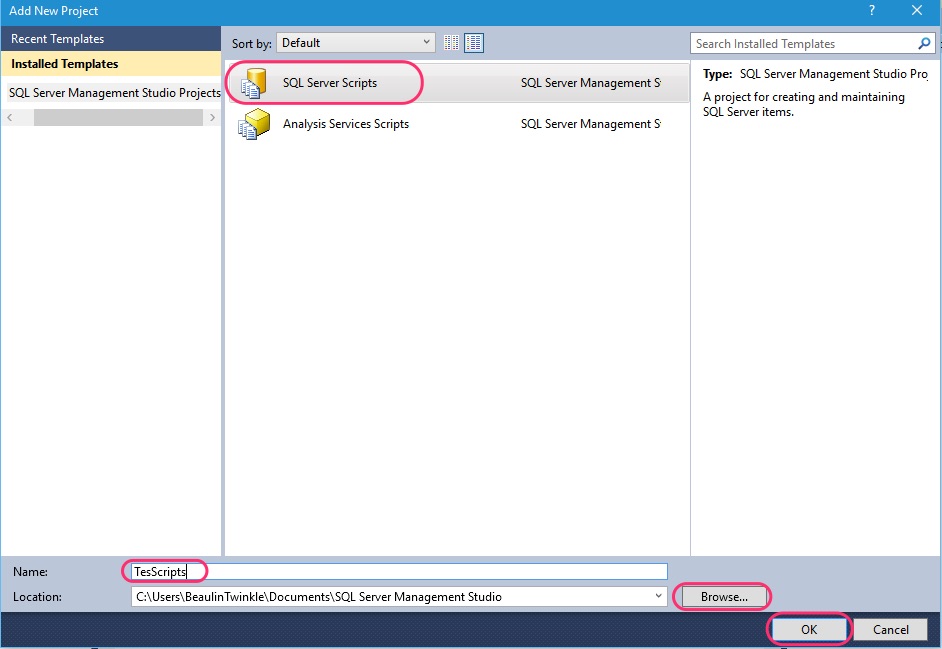
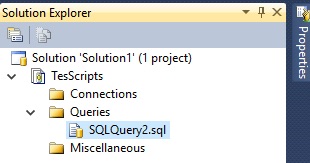
- The new project is now listed in the solution explorer.
- To move the existing file to the project folder, just drag and drop the query file. Dragging and dropping will create a copy of the query file under the project folder. You can remove the original file now.
- To create a project, right-click the solution in the solution explorer. In the right-click menu, select Add and then New Project….
- Saving Project / Solution:
- To save the project and the solution, press the multi save icon at the task bar. The file dialog will open and allow you to save the solution. You can change the name of the solution now.
- Opening Project / Solution:
- To open the solution again, you can launch the SSMS and open the solution from the Recent Projects and Solutions from File menu, or from the file dialog through File menu.
Reference
- SQL Server Management Studio in Microsoft Docs.